Note
Access to this page requires authorization. You can try signing in or changing directories.
Access to this page requires authorization. You can try changing directories.
You can use Azure Database Migration Service (Azure DMS) through the Azure portal to migrate databases from an on-premises instance of SQL Server to What is SQL Server on Azure Windows Virtual Machines? (Azure VM) with minimal downtime.
For database migration methods that might require some manual configuration, see SQL Server instance migration to SQL Server on Azure Virtual Machines.
In this tutorial, you migrate the AdventureWorks2025 database from an on-premises instance of SQL Server to a SQL Server on Azure VM with minimal downtime, using Azure DMS.
Note
This tutorial uses offline migration mode, which includes some acceptable downtime during the migration process. For online migration options, see Tutorial: Migrate SQL Server to SQL Server on an Azure Virtual Machine with Azure DMS (online).
In this tutorial, you learn how to:
- Launch the Migrate to Azure SQL wizard in the Azure portal.
- Specify details of your source SQL Server, backup location, and your target SQL Server on Azure VM.
- Configure the wizard to access source server and backups.
- Start and monitor the progress for your migration.
- Perform the migration cutover when you're ready.
Migration options
The following section describes how to use Azure Database Migration Service with the Azure SQL migration extension, or in the Azure portal.
Prerequisites
Before you begin the tutorial:
Ensure that you can access the Azure portal.
Make sure that the Microsoft.DataMigration resource provider is registered in your subscription.
Have an Azure account that's assigned to one of the following built-in roles:
Contributor for the target instance of SQL Server on an Azure VM, and for the storage account where you upload your database backup files from a Server Message Block (SMB) network share.
Reader role for the Azure resource group that contains the target instance of SQL Server on an Azure VM or for your Azure Storage account.
Owner or Contributor role for the Azure subscription.
As an alternative to using one of these built-in roles, you can assign custom roles.
When you use the Azure portal to migrate, the signed-in user must have Storage Blob Data Reader access on the blob container that holds the backup files, to be able to list files and folders during migration setup.
Create a target instance of SQL Server on Azure Virtual Machines.
If you have an existing Azure VM, register it with the SQL Server IaaS Agent extension in Full management mode.
Ensure that the logins you use to connect to the source SQL Server instance are members of the sysadmin server role, or have
CONTROL SERVERpermission.Provide an SMB network share, Azure Storage account file share, or Azure Storage account blob container that contains your full database backup files and subsequent transaction log backup files. Azure DMS uses the backup location during database migration.
Always use a dedicated storage account for migration. Sharing it with other workloads can lead to conflicts and security risks.
Once migration is done, either rotate the Storage Account Key to keep backups secure, or delete the storage account if it's no longer needed.
Azure DMS doesn't take database backups, and doesn't initiate any database backups on your behalf. Instead, the service uses existing database backup files for the migration.
If your database backup files are in an SMB network share, create an Azure Storage account that allows Azure DMS to upload the database backup files, and to migrate databases. Make sure you create the Azure Storage account in the same region where you create your instance of Azure DMS.
You can write each backup to either a separate backup file or to multiple backup files. Appending multiple backups such as full and transaction logs into a single backup media isn't supported.
You can provide compressed backups to reduce the likelihood of experiencing potential issues associated with migrating large backups.
Ensure that the service account running the source SQL Server instance has read and write permissions on the SMB network share that contains database backup files.
If you're migrating a database protected by transparent data encryption (TDE), migrate the certificate from the source SQL Server instance to SQL Server on an Azure VM before you migrate data. For more information, see Move a TDE protected database to another SQL Server.
Tip
If your database contains sensitive data protected by Always Encrypted, the migration process automatically migrates your Always Encrypted keys to your target instance of SQL Server on an Azure VM.
If your database backups are on a network file share, provide a computer on which you can install a self-hosted integration runtime to access and migrate database backups. The migration wizard gives you the download link and authentication keys to download and install your self-hosted integration runtime.
In preparation for the migration, ensure that the computer on which you install the self-hosted integration runtime has the following outbound firewall rules and domain names enabled:
Domain names Outbound port Description Public cloud: {datafactory}.{region}.datafactory.azure.net
or*.frontend.clouddatahub.net
Azure Government:{datafactory}.{region}.datafactory.azure.us
Microsoft Azure operated by 21Vianet:{datafactory}.{region}.datafactory.azure.cn443 Required by the self-hosted integration runtime to connect to Azure DMS.
For a newly created data factory in a public cloud, locate the fully qualified domain name (FQDN) from your self-hosted integration runtime key, in the format{datafactory}.{region}.datafactory.azure.net.
For an existing data factory, if you don't see the FQDN in your self-hosted integration key, use*.frontend.clouddatahub.netinstead.download.microsoft.com443 Required by the self-hosted integration runtime for downloading the updates. If you disable autoupdate, you can skip configuring this domain. *.core.windows.net443 Used by the self-hosted integration runtime that connects to the Azure Storage account to upload database backups from your network share Tip
If you already store your database backup files in an Azure Storage account, you don't need a self-hosted integration runtime during the migration process.
If you use a self-hosted integration runtime, make sure that the computer on which the runtime is installed can connect to the source SQL Server instance and the network file share where backup files are located.
Enable outbound port 445 to allow access to the network file share. For more information, see recommendations for using a self-hosted integration runtime.
If you're using Azure DMS for the first time, make sure that the
Microsoft.DataMigrationresource provider is registered in your subscription.
Start a new migration
This tutorial describes an offline migration from SQL Server to SQL Server on an Azure VM.
To start a new migration:
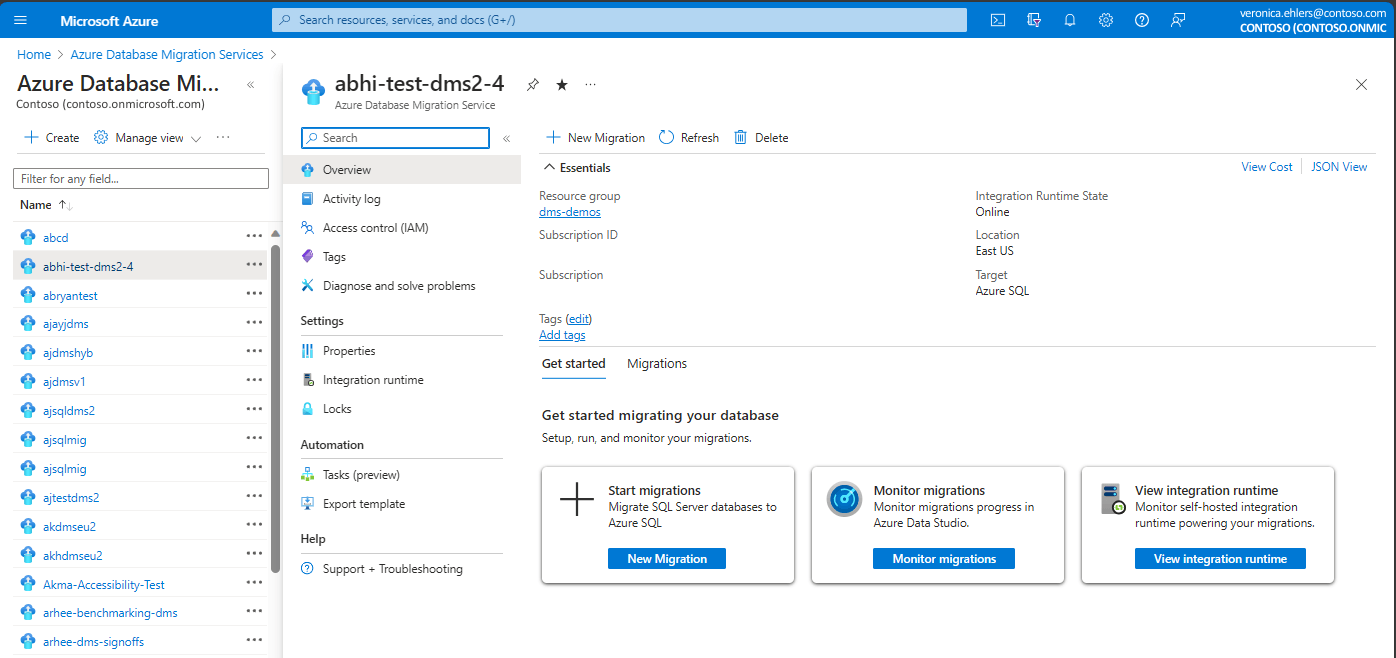
Go to Azure Database Migration Service in the Azure portal. Use +Create to create a new instance of Database Migration Service, or select an existing instance. Then, go to your Database Migration Service instance.
On the Overview pane of your Azure DMS instance, select New migration.
Under Select new migration scenario, choose your source, target server type, backup file storage location, migration mode as Offline migration, and choose Select.
Your database backups can be located either on an on-premises network share or in an Azure Storage blob container.
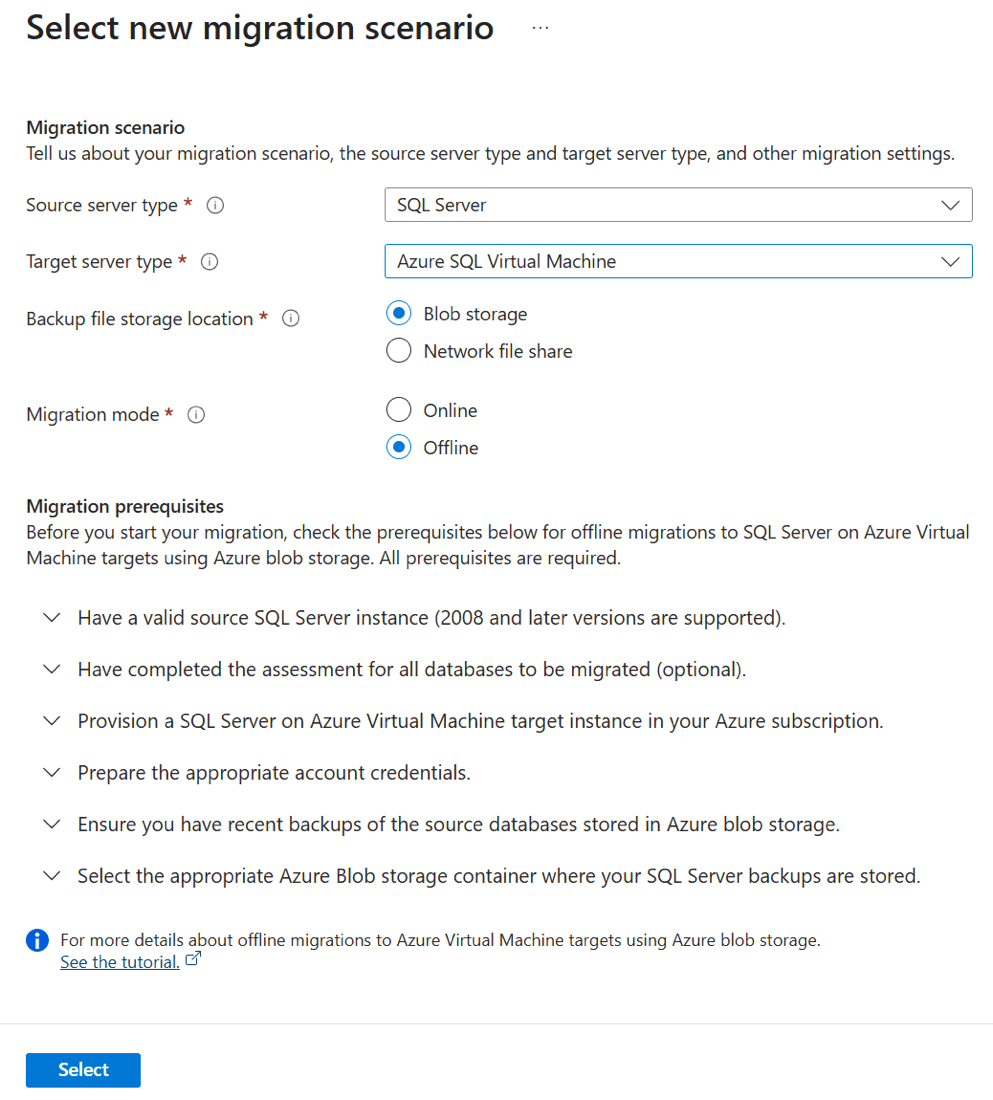
In offline migration mode, the source SQL Server database shouldn't be used for write activity while database backup files are restored on the target instance of SQL Server on an Azure VM. Application downtime persists from the start of the migration process until it's finished.
On the Azure SQL Virtual Machine Online Blob Migration Wizard, follow these steps:
On the Source details tab, enter details for the source SQL Server instance, then select Next: Connect to source SQL Server.
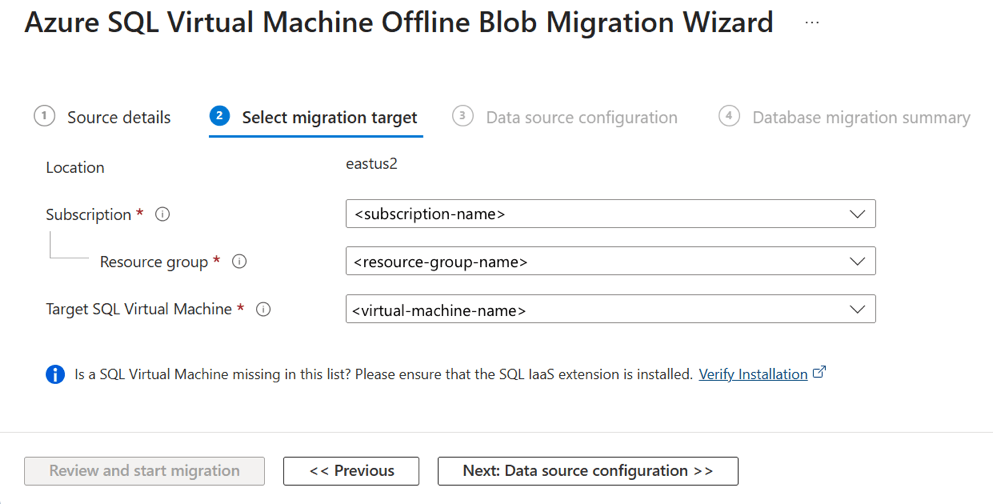
On the Select migration target tab, enter details for the subscription, resource group, and target SQL Server VM. Then select Next: Data source configuration.
Always use a dedicated storage account for migration. Sharing it with other workloads can lead to conflicts and security risks.
Once migration is done, either rotate the Storage Account Key to keep backups secure, or delete the storage account if it's no longer needed.
Azure DMS doesn't take database backups, and doesn't initiate any database backups on your behalf. Instead, the service uses existing database backup files for the migration.
If your database backup files are in an SMB network share, create an Azure Storage account that allows Azure DMS to upload the database backup files, and to migrate databases. Make sure you create the Azure Storage account in the same region where you create your instance of Azure DMS.
You can write each backup to either a separate backup file or to multiple backup files. Appending multiple backups such as full and transaction logs into a single backup media isn't supported.
You can provide compressed backups to reduce the likelihood of experiencing potential issues associated with migrating large backups.
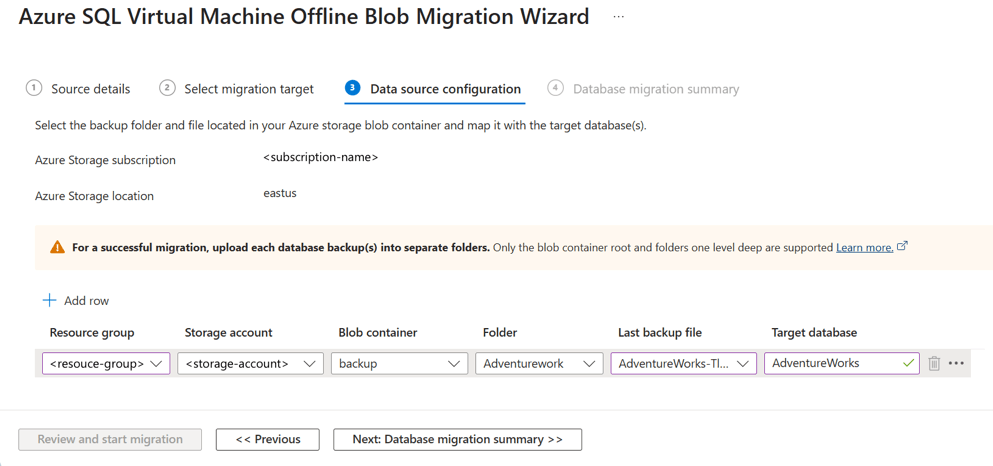
In the Data source configuration step, select the location of your database backups. Your database backups can be located either on an on-premises network share or in an Azure Storage blob container.
If you provide your database backups in an on-premises network share, set up a self-hosted integration runtime in the next step of the wizard. You need a self-hosted integration runtime to access your source database backups, check the validity of the backup set, and upload backups to Azure storage account. If your database backups are already in an Azure storage blob container, you don't need a self-hosted integration runtime.
For backups that are stored in an Azure Storage blob container, enter or select the following information:
Name Description Resource group The resource group where backup files are located. Storage account details The storage account where backup files are located. Blob container The blob container where backup files are located. Folder The folder where backup files are located. Last Backup File The file name of the last backup of the database you're migrating. Target database name You can modify the target database name during the migration process. If loopback check functionality is enabled and the source SQL Server and file share are on the same computer, the source can't access the file share with the FQDN. To fix this issue, disable loopback check functionality.
For backups that are located on a network share, enter the following additional information on the respective pages.
Name Description Source server name The FQDN or IP of the source server. Ensure that the service account running the source SQL Server instance has read privileges on the network share. Authentication Type Select the authentication type: SQL or Windows Source Credentials - Username The credential (Windows and SQL authentication) to connect to the source SQL Server instance and validate the backup files. Source Credentials - Password The credential (Windows and SQL authentication) to connect to the source SQL Server instance and validate the backup files. Network share location that contains backups The network share location that contains the full and transaction log backup files. The migration process automatically ignores any invalid files or backup files in the network share that don't belong to the valid backup set. Windows user account with read access to the network share location The Windows credential (username) that has read access to the network share to retrieve the backup files. Password The Windows credential (password) that has read access to the network share to retrieve the backup files. Target database name You can modify the target database name during the migration process.


Backup storage scenarios
The Azure SQL migration extension for Azure Data Studio doesn't require specific configurations on your Azure Storage account network settings to migrate your SQL Server databases to Azure.
Make sure your resources can access the Azure Storage account. Depending on your database backup location and desired storage account network settings, refer to the following table for the various migration scenarios and network configurations:
| Scenario | SMB network share | Azure Storage account container |
|---|---|---|
| Enabled from all networks | No extra steps | No extra steps |
| Enabled from selected virtual networks and IP addresses | On-premises self-hosted integration runtime (SHIR) | Backups stored in Azure Storage container |
| Enabled from selected virtual networks and IP addresses + private endpoint | Azure VM self-hosted integration runtime (SHIR) | Backups stored in Azure Storage container (Private endpoint) |
On-premises self-hosted integration runtime (SHIR)
If you install your SHIR on your on-premises network, follow these steps:
Connect to the Azure portal from the SHIR machine.
Open your Azure Storage account, and go to the Networking pane.
Make sure Public network access is set to Enabled from selected virtual networks and IP addresses.
In the Firewall section, select the Add your client IP address checkbox.
Enter the client IP address of the host machine, and select Save.
Create a Database Migration Service instance
Step 1: In the Azure portal, navigate to the Azure Database Migration Service page. Create a new instance of Azure Database Migration Service, or reuse an existing instance that you created earlier.
Use an existing instance of Database Migration Service
To use an existing instance of Database Migration Service:
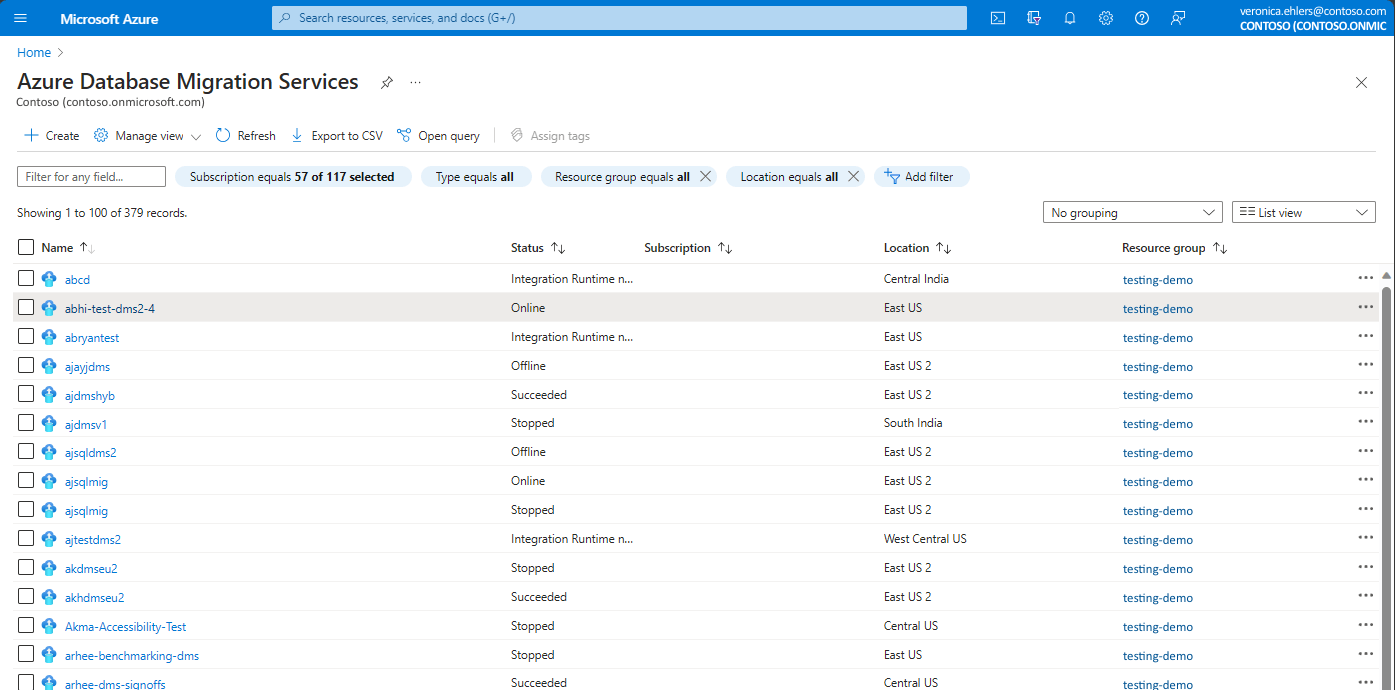
On Azure portal, under Azure Database Migration Services, select an existing instance of Database Migration Service that you want to use, ensuring that it's present in right Resource Group and region.

Create a new instance of Database Migration Service
To create a new instance of Database Migration Service:
On Azure portal, under Azure Database Migration Service, select Create.
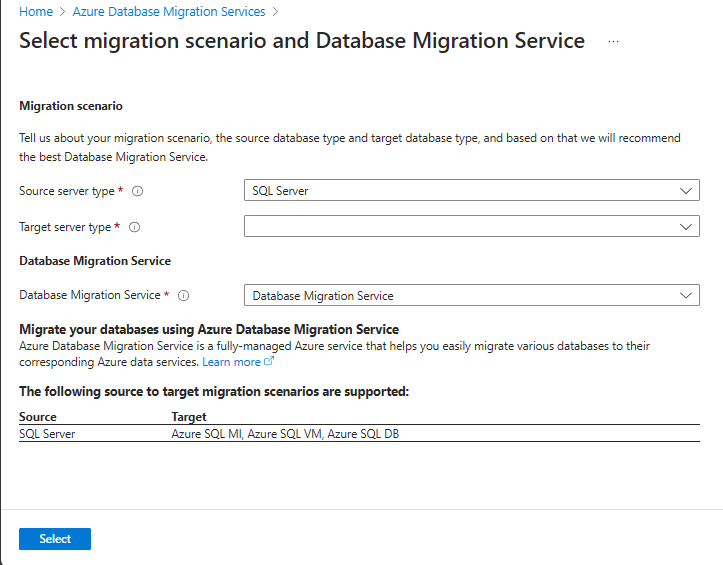
In Select migration scenario and Database Migration Service, select the desired input like Source and Target server type, choose Database Migration Service and choose Select.
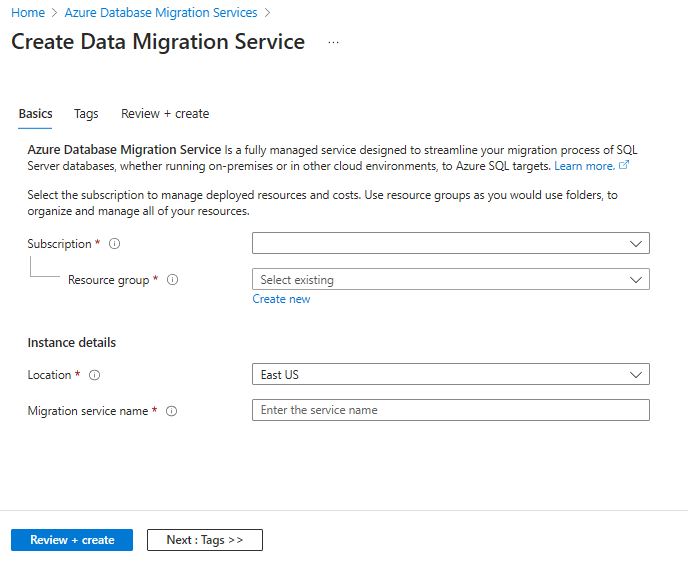
On the next screen Create Data Migration Service, select your subscription and resource group, then select Location, and enter the Database Migration Service name. Select Review + Create. This creates the Azure Database Migration Service.
If the self-hosted integration runtime (SHIR) is required, on the overview page of your Database Migration Service and under Settings, select Integration runtime, and complete the following steps:
Select Configure integration runtime and choose the Download and install integration runtime link to open the download link in a web browser. Download the integration runtime, and then install it on a computer that meets the prerequisites for connecting to the source SQL Server instance. For more information, see SHIR recommendations.
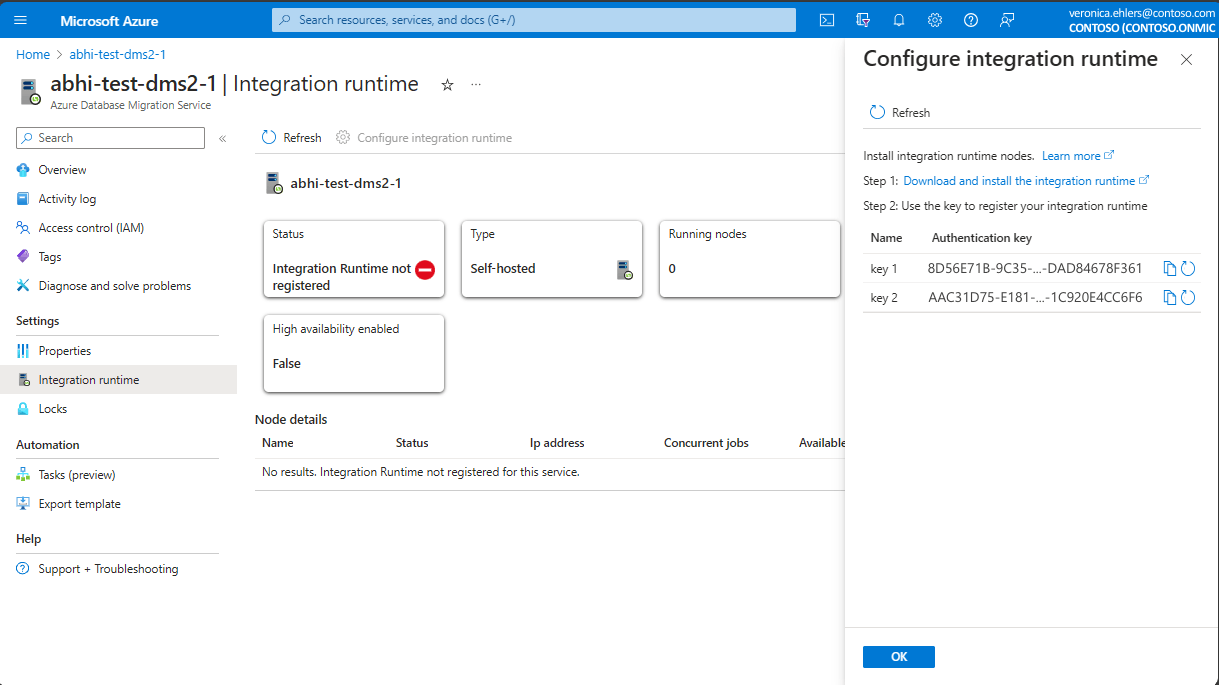
When installation is finished, Microsoft Integration Runtime Configuration Manager automatically opens to begin the registration process.
In the Authentication key table, copy one of the authentication keys that are provided in the wizard and paste it in Microsoft Integration Runtime Configuration Manager.
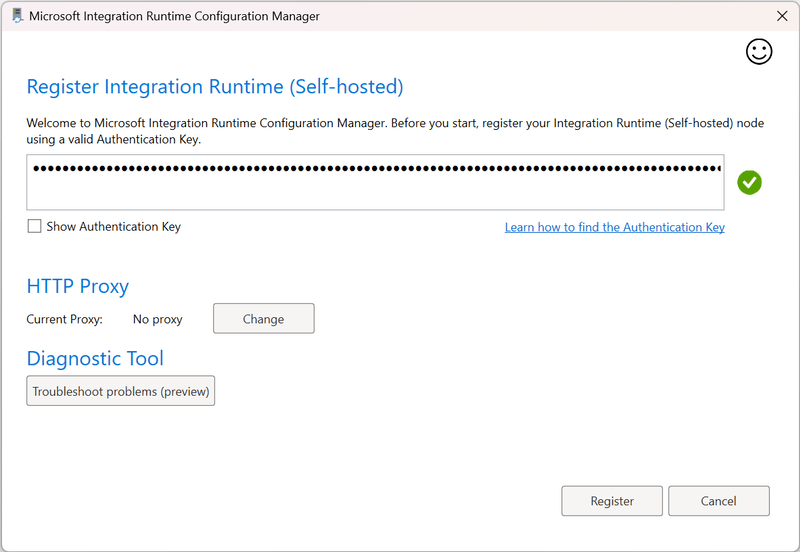
If the authentication key is valid, a green check icon appears in Integration Runtime Configuration Manager. A green check indicates that you can continue to Register.
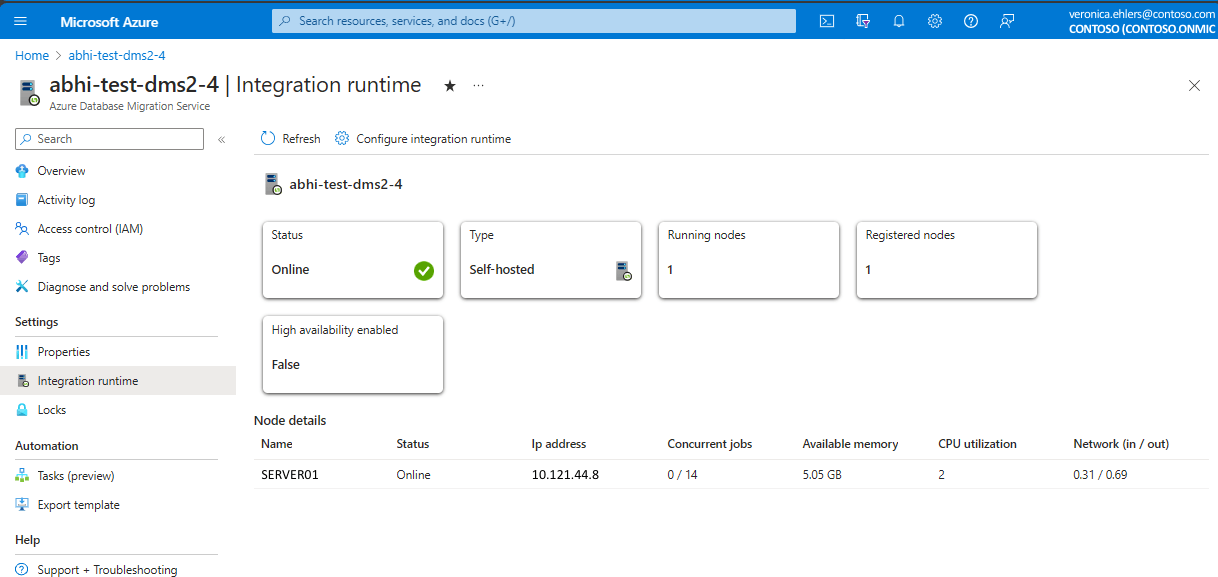
After you register the self-hosted integration runtime, close Microsoft Integration Runtime Configuration Manager. It might take several minutes to reflect the Node details on Azure portal for Database Migration Service, under Settings > Integration runtime.
Note
For more information about the self-hosted integration runtime, see Create and configure a self-hosted integration runtime.


Start the database migration
On the Database migration summary tab, review the details, then select Start migration. The service starts the database migration and automatically takes you back to the Azure DMS dashboard.

Monitor the database migration
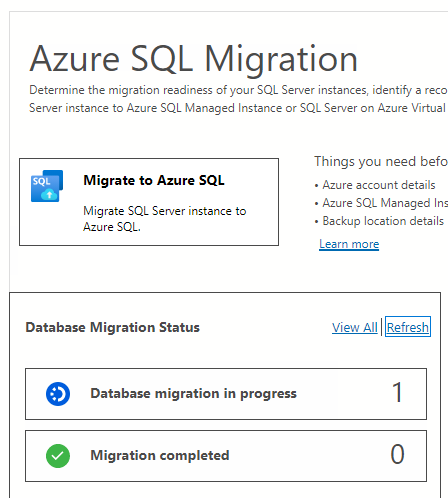
To monitor your database migration, on the Overview pane of your DMS instance, select Monitor migrations.
Under the Migrations tab, you can track migrations that are in progress, completed, and failed (if any), or you can view all database migrations. In the menu bar, select Refresh to update the migration status.


Azure DMS returns the latest known migration status each time migration status refreshes. The following table describes possible statuses:
| Status | Description |
|---|---|
| Arrived | The backup file arrived in the source backup location and was validated. |
| Uploading | The integration runtime is uploading the backup file to Azure storage. |
| Uploaded | The backup file was uploaded to Azure storage. |
| Restoring | The service is restoring the backup file to SQL Server on an Azure VM. |
| Restored | The backup file was successfully restored on SQL Server on an Azure VM. |
| Canceled | The migration process was canceled. |
| Ignored | The backup file was ignored because it doesn't belong to a valid database backup chain. |
After all database backups are restored on the instance of SQL Server on an Azure VM, Azure DMS initiates an automatic migration cutover to ensure that the migrated database is ready to use. The migration status changes from In progress to Succeeded.
Limitations
If you migrate a single database, you must place the database backups in a flat-file structure inside a database folder (including container root folder). You can't nest these folders, as nesting isn't supported.
If you migrate multiple databases using the same Azure Blob Storage container, you must place backup files for different databases in separate folders inside the container.
You can't overwrite existing databases in your target SQL Server on an Azure VM using DMS.
Azure DMS doesn't support configuring high availability and disaster recovery on your target to match source topology.
The following server objects aren't supported:
- SQL Server Agent jobs
- Credentials
- SQL Server Integration Services (SSIS) packages
- Server audit
You can't use an existing self-hosted integration runtime created from Azure Data Factory (ADF) for database migrations with DMS. Initially, you should create the self-hosted integration runtime using the Azure SQL migration extension in Azure Data Studio. You can reuse it for further database migrations.
VMs with target versions of SQL Server 2008 and older aren't supported when migrating to SQL Server on an Azure VM.
If you use a VM with SQL Server 2012 or SQL Server 2014, you need to store your source database backup files on an Azure Storage blob container instead of using the network share option. Store the backup files as page blobs since block blobs are only supported in SQL Server 2016 and later versions.
You must make sure the SQL Server IaaS Agent Extension in the target Azure VM is in Full mode instead of Lightweight mode.
Migration to Azure SQL VM using DMS uses SQL Server IaaS agent internally. SQL Server IaaS Agent Extension only supports management of default server instance or single named instance.
You can migrate a maximum of 100 databases to the same Azure VM as the target using one or more migrations simultaneously. Moreover, once a migration with 100 databases finishes, wait for at least 30 minutes before starting a new migration to the same SQL Server on an Azure VM as the target. Also, every migration operation (start migration, cutover) for each database takes a few minutes sequentially. For example, to migrate 100 databases, it might take approximately 200 (2 x 100) minutes to create the migration queues and approximately 100 (1 x 100) minutes to cutover all 100 databases (excluding backup and restore timing). Therefore, the migration becomes slower as the number of databases increases. You should either schedule a longer migration window in advance based on rigorous migration testing, or partition large numbers of databases into batches when migrating them to SQL Server on an Azure VM.
Apart from configuring the Networking/Firewall of your Azure Storage account to allow your VM to access backup files, you also need to configure the Networking/Firewall of your SQL Server on an Azure VM to allow outbound connection to your storage account.
You need to keep the target Azure VM powered on while the SQL Server migration is in progress. Also, when creating a new migration, failover or cancel the migration.
Possible error messages
Login failed for user 'NT Service\SQLIaaSExtensionQuery
Error: Login failed for user 'NT Service\SQLIaaSExtensionQuery
Reason: SQL Server instance is in single-user mode. One possible reason is the target SQL Server VM is in upgrade mode.
Solution: Wait for the target SQL Server VM to exit the upgrade mode, and start migration again.
Failed to create restore job
Error: Ext_RestoreSettingsError, message: Failed to create restore job.;Cannot create file 'F:\data\XXX.mdf' because it already exists.
Solution: Connect to the target SQL Server VM and delete the XXX.mdf file. Then, start migration again.
Related content
- Migrate a SQL Server database to SQL Server on a virtual machine
- What is SQL Server on Azure Windows Virtual Machines?
- Connect to a SQL Server virtual machine on Azure
- Known issues, limitations, and troubleshooting
- Migrate a database to SQL Server on Azure Virtual Machines by using the T-SQL RESTORE command