Note
Access to this page requires authorization. You can try signing in or changing directories.
Access to this page requires authorization. You can try changing directories.
In part 2 of this tutorial series, you dive a little deeper into the Visual Studio build and debug features you need for daily development. These features include managing multiple projects, debugging, and referencing third-party packages. You run the C# console app you created in Part 1 of this tutorial, and explore some features of the Visual Studio integrated development environment (IDE). This tutorial is part 2 of a two-part tutorial series.
In this tutorial, you complete the following tasks:
- Add a second project.
- Reference libraries and add packages.
- Debug your code.
- Inspect your completed code.
Prerequisites
To work through this article, you can use either of these calculator apps:
- The calculator console app from part 1 of this tutorial.
- The C# calculator app in the vs-tutorial-samples repo. To get started, open the app from the repo.
Add another project
Real-world code involves projects working together in a solution. You can add a class library project to your calculator app that provides some calculator functions.
In Visual Studio, you use the menu command File > Add > New Project to add a new project. You can also right-click on the solution in Solution Explorer to add a project from the context menu.
Reference .NET libraries: Write to a log
Add a NuGet Package: Write to a JSON file
To output operations in JSON, a popular and portable format for storing object data, you can reference the Newtonsoft.Json NuGet package. NuGet packages are the primary distribution method for .NET class libraries.
In Solution Explorer, right-click the Dependencies node for the CalculatorLibrary project, and choose Manage NuGet Packages.
The NuGet Package Manager opens.
Search for and select the Newtonsoft.Json package, and select Install.
Add a
usingdirective forNewtonsoft.Jsonat the beginning of CalculatorLibrary.cs.// CalculatorLibrary.cs using Newtonsoft.Json;Create the
JsonWritermember object, and replace theCalculatorconstructor with the following code:// CalculatorLibrary.cs JsonWriter writer; public Calculator() { StreamWriter logFile = File.CreateText("calculatorlog.json"); logFile.AutoFlush = true; writer = new JsonTextWriter(logFile); writer.Formatting = Formatting.Indented; writer.WriteStartObject(); writer.WritePropertyName("Operations"); writer.WriteStartArray(); }Modify the
DoOperationmethod to add the JSONwritercode:// CalculatorLibrary.cs public double DoOperation(double num1, double num2, string op) { double result = double.NaN; // Default value is "not-a-number" if an operation, such as division, could result in an error. writer.WriteStartObject(); writer.WritePropertyName("Operand1"); writer.WriteValue(num1); writer.WritePropertyName("Operand2"); writer.WriteValue(num2); writer.WritePropertyName("Operation"); // Use a switch statement to do the math. switch (op) { case "a": result = num1 + num2; writer.WriteValue("Add"); break; case "s": result = num1 - num2; writer.WriteValue("Subtract"); break; case "m": result = num1 * num2; writer.WriteValue("Multiply"); break; case "d": // Ask the user to enter a non-zero divisor. if (num2 != 0) { result = num1 / num2; } writer.WriteValue("Divide"); break; // Return text for an incorrect option entry. default: break; } writer.WritePropertyName("Result"); writer.WriteValue(result); writer.WriteEndObject(); return result; }Add a method to finish the JSON syntax once the user is done entering operation data.
 // CalculatorLibrary.cs
 public void Finish()
 {
     writer.WriteEndArray();
     writer.WriteEndObject();
     writer.Close();
 }
At the end of Program.cs, before the
return;, add a call toFinish:// Program.cs // Add call to close the JSON writer before return calculator.Finish(); return; }Build and run the app, and after you're done entering a few operations, close the app by entering the n command.
Open the calculatorlog.json file in File Explorer. You should see something like the following content:
{
 "Operations": [
     {
     "Operand1": 2.0,
     "Operand2": 3.0,
     "Operation": "Add",
     "Result": 5.0
     },
     {
     "Operand1": 3.0,
     "Operand2": 4.0,
     "Operation": "Multiply",
     "Result": 12.0
     }
 ]
}
Debug: Set and hit a breakpoint
The Visual Studio debugger is a powerful tool. The debugger can step through your code to find the exact point where there's a programming mistake. You can then understand what corrections you need to make, and make temporary changes so you can continue running your app.
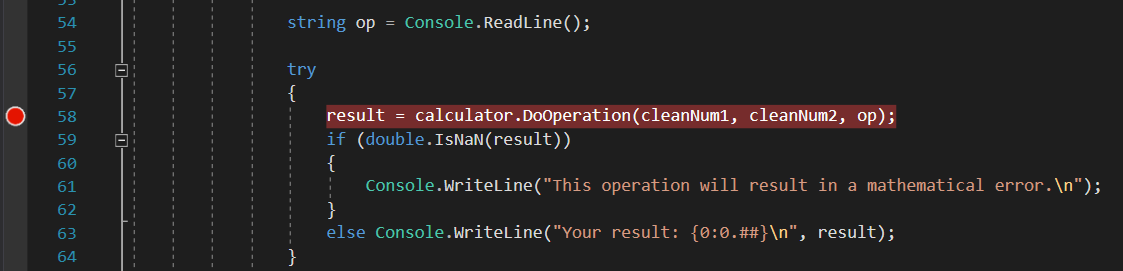
In Program.cs, click in the gutter to the left of the following code line. You can also click in the line and select F9, or right-click the line and select Breakpoint > Insert Breakpoint.
// Program.cs
result = calculator.DoOperation(cleanNum1, cleanNum2, op);
The red dot that appears indicates a breakpoint. You can use breakpoints to pause your app and inspect code. You can set a breakpoint on any executable line of code.
Build and run the app. Enter the following values for the calculation:
- For the first number, enter 8.
- For the second number, enter 0.
- For the operator, let's have some fun. Enter d.
The app suspends where you created the breakpoint, which is indicated by the yellow pointer on the left and the highlighted code. The highlighted code hasn't yet executed.

Now, with the app suspended, you can inspect your application state.
Debug: View variables
In the highlighted code, hover over variables such as
cleanNum1andop. The current values for these variables,8anddrespectively, appear in DataTips.
When debugging, checking to see whether variables hold the values you expect is often critical to fixing issues.
In the lower pane, look at the Locals window. If it's closed, select Debug > Windows > Locals to open it.
The Locals window shows each variable that's currently in scope, along with its value and type.
Look at the Autos window.
The Autos window is similar to the Locals window, but shows the variables immediately preceding and following the current line of code where your app is paused.
Note
If you don't see the Autos window, select Debug > Windows > Autos to open it.
Next, execute code in the debugger one statement at a time, which is called stepping.
Debug: Step through code
Press F11, or select Debug > Step Into.
Using the Step Into command, the app executes the current statement and advances to the next executable statement, usually the next line of code. The yellow pointer on the left always indicates the current statement.

You just stepped into the
DoOperationmethod in theCalculatorclass.To get a hierarchical look at your program flow, look at the Call Stack window. If it's closed, select Debug > Windows > Call Stack to open it.

This view shows the current
Calculator.DoOperationmethod, indicated by the yellow pointer. The second row shows the function that called the method, from theMainmethod in Program.cs.The Call Stack window shows the order in which methods and functions are getting called. This window also provides access to many debugger features, such as Go to Source Code, from its shortcut menu.
Press F10, or select Debug > Step Over, several times until the app pauses on the
switchstatement.// CalculatorLibrary.cs switch (op) {The Step Over command is similar to the Step Into command, except that if the current statement calls a function, the debugger runs the code in the function, and doesn't suspend execution until the function returns. Step Over is faster than Step Into if you're not interested in a particular function.
Press F10 one more time, so that the app pauses on the following line of code.
// CalculatorLibrary.cs
if (num2 != 0)
{
This code checks for a divide-by-zero case. If the app continues, it throws a general exception (an error), but you might want to try something else, like viewing the actual returned value in the console. One option is to use a debugger feature called edit-and-continue to make changes to the code and then continue debugging. However, there's a different trick to temporarily modify the execution flow.
Debug: Test a temporary change
Select the yellow pointer, currently paused on the
if (num2 != 0)statement, and drag it to the following statement:// CalculatorLibrary.cs result = num1 / num2;Dragging the pointer here causes the app to completely skip the
ifstatement, so you can see what happens when you divide by zero.Press F10 to execute the line of code.
If you hover over the
resultvariable, it shows a value of Infinity. In C#, Infinity is the result when you divide by zero.Press F5, or select Debug > Continue Debugging.
The infinity symbol appears in the console as the result of the math operation.
Close the app properly by entering the n command.
Code complete
Next steps
Congratulations on completing this tutorial! To learn more, continue with the following content: