Note
Access to this page requires authorization. You can try signing in or changing directories.
Access to this page requires authorization. You can try changing directories.
Component collections enable makers to create and share reusable components across agents.
When you use collections, you can:
- Get to manage, search, and create component collections from the side bar in Copilot Studio, without needing to open an agent, making shared building blocks easier to find and reuse.
- Use one-click export and simplified import. Copilot Studio packages collections into versioned managed solutions and lets you import directly from agent settings, streamlining maker experience.
- Share collections with teammates while controlling edit access, enabling safe collaboration and protecting core assets.
- Restrict a collection so it can be used only by its intended agent (the primary agent), helping teams modularize large or sensitive copilots without unintended reuse.
- Test how a collection behaves in different agents directly from the Component Collections workspace, speeding iteration and ensuring consistent results.
- Collect and share newer connector types, including child agents, model context protocols, connectors, and flows.
- Remove or adjust dependencies to decouple assets and support independent release cycles across teams.
Agent components include:
- topics
- knowledge
- tools
- child agents
- model context protocols
- connectors
- flows
- entities
To edit a component collection, or add a component collection to an agent, you must be the person who created the collection, or a user with the system customizer or system admin role. Once a component collection is available for an agent, all agent authors can see and use the collection but they can't change the components inside the collection. Learn more about configuring user security in an environment.
Create component collections
You create component collections directly from the Settings page for an agent, or from the Component collections page. When you add components from an agent to a collection, the components are moved to the collection and the agent references the components within the collection.
You can share the collection with other agents in your environment, or export it to import it into other environments.
Create a component collection from an agent
Open the agent that contains the components you want to make available as a component collection.
Go to Settings and select Component collections.
If you're about to create the first component collection in your environment, select Create. Otherwise, select New.
Enter a name and a description for your component collection.
Select Next.
Select the components you want to add to the component collection. You can use the categories and the Search field to narrow down the list of components. You can connect child agents when reviewing the collection.
Any component dependencies are automatically selected and added to the collection. You can exclude dependencies only if you've set a primary agent for the component collection.
The primary agent is the agent that owns the components in the collection. If you don't set a primary agent, the component collection is owned by the environment, and therefore must have access to the dependencies.
Tip
If you uploaded files as knowledge sources for an agent, adding such files to a component collection removes them from the originating agent.
As a workaround, you can move such files from the component collection back to their originating agent.Select Next.
Review the content of your collection, and select Create.
Create a component collection at the environment level
On the side bar, select the three dots (…), then select Component collections.
Select Add new, then select Component collection.
Enter a name and a description for your component collection.
Select Finish.
Connect the agent that contains the components you want to share to your new component collection.
Add components from the selected agent to the collection.
Connect an agent to a component collection
On the side bar, select the three dots (…), then select Component collections.
Select the collection you want to connect to an agent.
In the Connected agents section, select Add agent. Select the agent you want to connect, and then Add.
You can add any components from the connected agents to your component collection. All the connected agents can also use any components from that collection.
Add components from an agent to a collection
On the side bar, select the three dots (…), then select Component collections.
Select the collection where you want to add components.
Connect the agent that contains the components you want to reuse in the collection, if it isn't already.
In the Add components section, select Add from an agent.
Note
If you haven't connected any agents to the component collection, the option to add components from an agent won't be available.
Select the desired agent, and select Next.
Select the components you want to add to the component collection. You can use the category labels and the Search components field to narrow down the list of components.
Select Next.
Review the content of your collection, and select Add to collection.
Set a primary agent for a component collection and exclude dependencies
You can set a single agent as the primary agent for a component collection. Makers have the option to select a primary agent if they want only one specific agent to use the component collection.
If your collection has multiple connected agents, you can't set a primary agent. You must disconnect all other agents first.
When you set a primary agent, you can also exclude dependencies when adding components from that agent. This allows you to create smaller component collections that don't include all dependencies, which can be useful when you want to share only specific components.
On the side bar, select the three dots (…), then select Component collections.
Select the collection for which you want to set a primary agent.
In the Connected agents section, select the three dots (…) next to the agent and then select Set primary agent.

Important
If your collection has multiple connected agents, the option to set a primary agent isn't available. For each agent other than the one you want to set as primary, select Disconnect from agent.
To exclude dependencies when adding components from the primary agent:
Select Add from an agent in the component collection.
Select the primary agent, and select Next.
Select the components you want to add to the component collection. Clear Include component dependencies.
Select Next.
Review the content of your collection, and select Add to collection.
Share a component collection
You can share a component collection with other users in your organization, and specify whether they have Viewer or Editor permissions. For more information about permission roles for Copilot Studio users, see Control how agents are shared.
On the side bar, select the three dots (…), then select Component collections.
Select the collection you want to share.
On the top menu bar, select Share.
In the sharing panel, enter the names or email addresses of other people you want to share the component collection with. For each user, specify the permission roles (Viewer or Editor).
Import and export collections
You can export collections so you can import them into other environments. When you export a collection, it becomes managed. To export a collection without it being managed, see Use solutions for complex collections.
To export a collection:
On the side bar, select the three dots (…), then select Component collections.
Open the collection you want to export.
On the top menu bar, select Export.
The export begins, and a notification bar appears. When the export is ready, the notification changes to include a link to download the collection as a .zip file.
To import a collection:
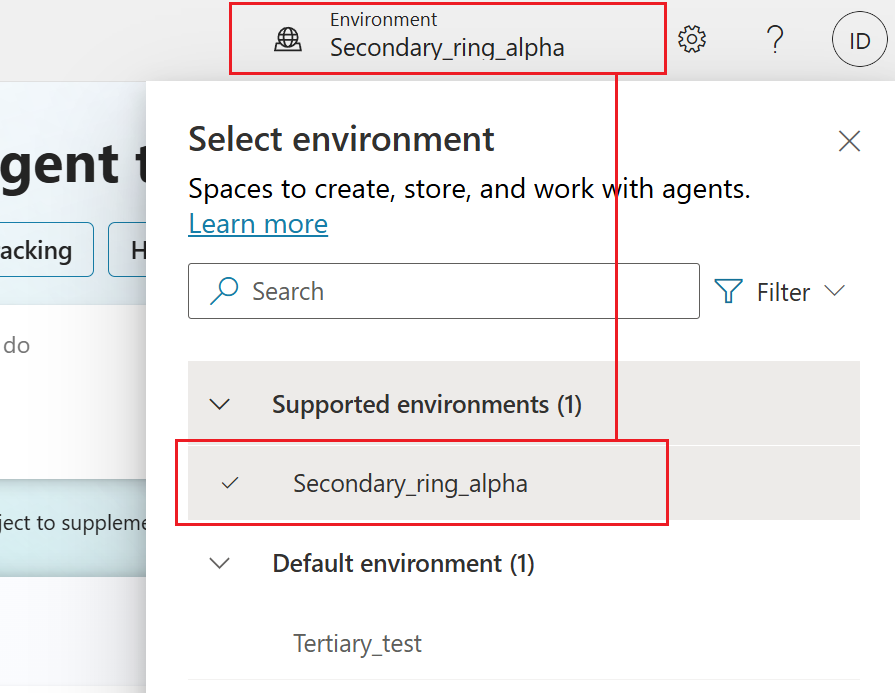
In Copilot Studio, ensure the environment where you want to import your collection is selected:
Open the agent you want to connect to the collection, and then select Settings on the top bar.
Select Component collections on the side menu, and then select Import solution.
In the panel that appears, select Browse files and then choose the exported collection.
The details of the collection are shown. You can exclude plugin steps and flows under the Advanced settings section.
Tip
If you try to import a collection into the same environment where you exported it from, you'll see an error message. Confirm you're in the targeted environment that doesn't contain the collection.
Select Next. The import panel closes, and a message shows the collection was imported successfully.
Use solutions for complex collections
You can also use solutions to export agent components from one environment and import them into another. The solution acts as a carrier for the components. You can export and import multiple agent components in one solution.
Generally, use solutions for complex component collections. For example, if your collection has connectors or environment variables.
Create a solution
Go to the Solutions page.
Select New solution.
Enter the following information for the new solution:
- Display name: The name to show in the list of solutions. You can change it later.
- Name: The unique name of the solution, generated from Display name. You can only change it before you save the solution.
- Publisher: Select the default publisher or create a new one. Consider creating a single publisher and use it consistently across all environments for your solution. Learn more about solution publishers.
- Version: Enter a number for the version of your solution. The version number is included in the file name when you export the solution.
Select Create.
Add component collections to a solution
Go to the Solutions page, and open the desired solution if it isn't already.
Select Add existing, point to Agent, and select Component collection.
A panel appears, showing all available component collections.
Select the component collections you want to export, and then select Add at the bottom of the panel.
Export a solution to share component collections in other environments
You export and import component collections by exporting and importing the solutions that contain them from one environment to another.
Go to the Solutions page.
Select the three dots (⋮) for the solution that contains the component collections you want to export, and then select Export solution.
Enter or select the following options:
- Version number: Copilot Studio automatically increments your solution version. You can accept the default or enter your own.
- Export as: Select the package type, either Managed or Unmanaged. Learn more about managed and unmanaged solutions.
Select Export. The export might take several minutes to complete. Watch the status message at the top of the Solutions page.
When the export is finished, select the Download button to download a .zip file.
The file name has this format: SolutionName_Version_SolutionType.zip—for example, ContosoSolution_1_0_0_1_managed.zip.
Import a solution to add component collections to an environment
Go to the Solutions page.
Select the environment where you want to import your component collection.
Select Import solution.
In the Import panel, select Browse, select the .zip file that contains the solution with your component collection, and then select Next.
Select Import. The import might take several minutes to complete. Watch the status message at the top of the Solutions page.
Wait a few moments while the import completes.
If the import isn't successful, select Download log file to download an XML file that contains details about what caused the import to fail. The most common reason an import fails is that the solution doesn't contain some required components.
Add imported component collections to your agent
After importing a component collection, you can use it in your agents.
Open the agent where you want to use the component collection.
Go to the Settings page and select Component collections.
Next to the imported component collection, select the three dots (…) and select Add to agent.
A message appears prompting you to confirm.
Select Add to agent.
The name of your agent appears under Active for for this component collection.
Review the components from the imported collection, and publish the agent to make the changes available to your customers.
Add components to a component collection in a custom solution
If you add new agent components to a component collection in Copilot Studio, you must also add them to any unmanaged solution that refers to this component collection.
Go to the Solutions page, and open the unmanaged solution that contains the component collection to update.
In the Objects pane, select Agent component collections.
Select the three dots (⋮) for the collection you want to update, point to Advanced, and select Add required objects.
Select OK.
In the Objects pane, you can select Agent components to verify that the expected components now appear.
Open the solution explorer
In Copilot Studio, select the three dots (…) on the side bar, and then select Solutions.
The Solutions page opens in a new browser tab.