Note
Access to this page requires authorization. You can try signing in or changing directories.
Access to this page requires authorization. You can try changing directories.
As a seller, you can view the hierarchy to better understand the relationships between records. An administrator must first design and publish a hierarchy before the organization can use it.
For example, your administrator might publish an Account hierarchy that you use to visualize a customer's related companies, regional offices, and branch locations. Your administrator might also publish a hierarchy called Account contacts that shows a hierarchy of people and their reporting structure and job titles associated with a given account.
Open a hierarchy
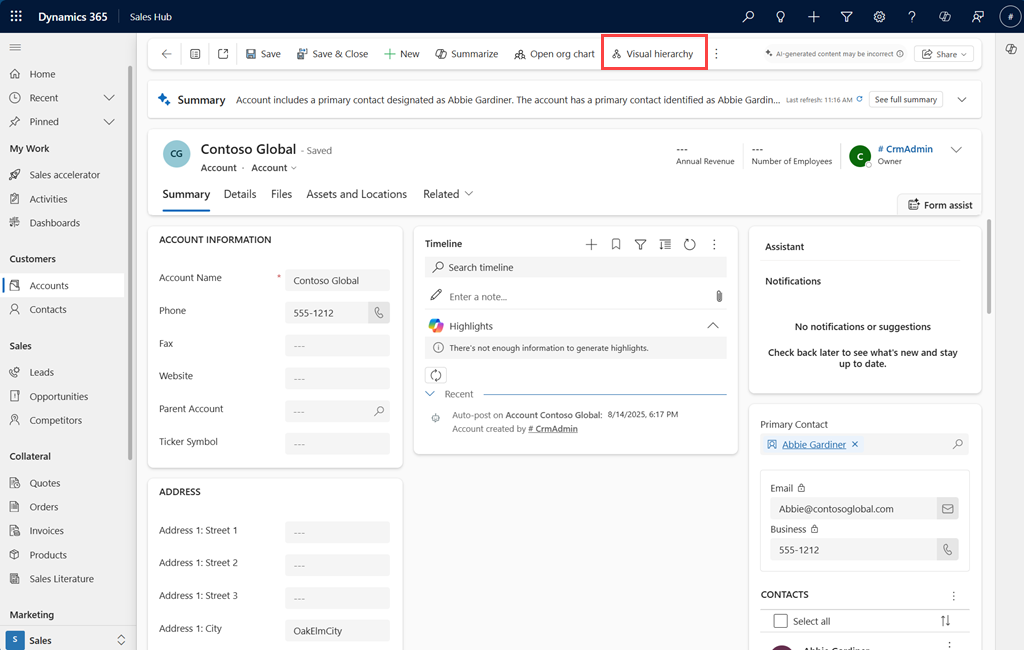
When a hierarchy is available, you see a View hierarchy button on the command bar.
In form view, open a record such as an account or a contact to display the Visual hierarchy button on the command bar.
In a grid view, select a single record to enable the Visual hierarchy button. If you select more than one record, the button is disabled.
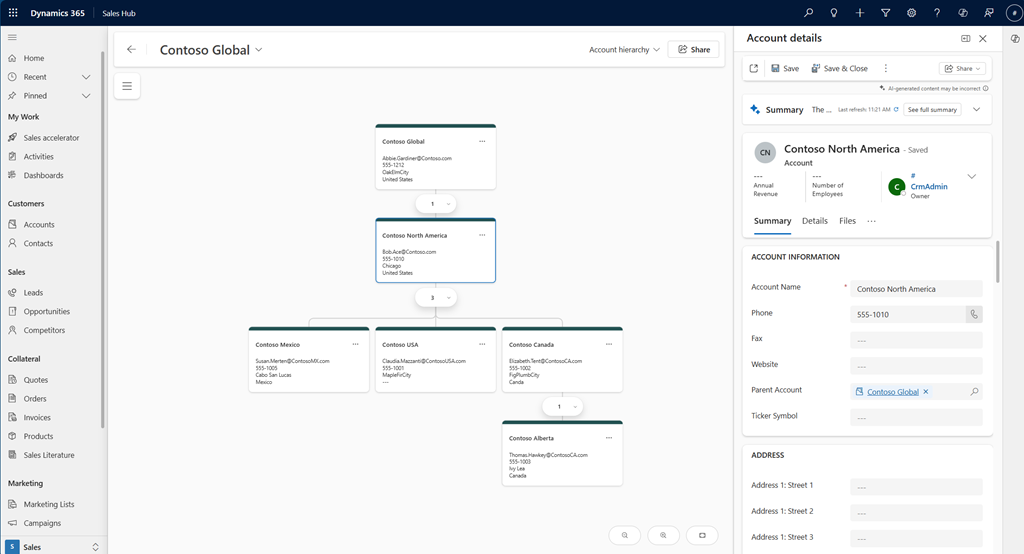
Select the Visual hierarchy button to open the current record in the hierarchy viewer, which displays a tree of tiles representing records and their relationships.
Note
- If hierarchies aren't enabled, contact your administrator to enable hierarchies.
- The View hierarchy button only appears if the selected record has appropriate parent-child relationships to display in a hierarchy.
- You might need to select More commands for Table (⋮) on the command bar, if the View hierarchy button is not available directly on the command bar.
Considerations for viewing a hierarchy
When you view a record, the application looks for a hierarchy to display it in. To do this, the hierarchy searches only the first‑ and second‑level tables of the published hierarchies. It doesn't search deeper levels.
For example, in a multitable hierarchy such as Account > Contacts > Opportunities, the hierarchy opens an account or a contact record, but not an opportunity record because the opportunity table is more than two levels deep.
For a single table hierarchy such as Account with the Expand all option enabled, the hierarchy opens an account with a parent or child account, irrespective of the depth because the Account table is the top of this hierarchy.
Understand a hierarchy
Let's look at the key features and functionality of a hierarchy.
Navigating a hierarchy
| Number | Feature | Description |
|---|---|---|
| 1 | View hierarchy treeview | Search and quickly navigate large hierarchies. |
| 2 | Record count | Displays the number of immediate child records next to the parent record. |
| 3 | Expand and collapse | Expand or collapse child nodes. |
| 4 | Change record | Search and change the selected record. |
| 5 | Highlight selected tiles | Select the name on the left pane to highlight the corresponding tile in the hierarchy. |
| 6 | Switch hierarchies | Switch between multiple hierarchies that are available for the same table. |

Interacting with a hierarchy
| Feature | Description |
|---|---|
| Child record display limit | The hierarchy displays five child records at a time. If there are more, select Show more to load more records. |
| Tile details | The details shown in tiles depend on the form selected while configuring the hierarchy. If you need to see more or different information, contact your administrator to request changes. |
| Open record details | Select the tile to open more details about the record in the right pane based on the form that is configured in the hierarchy. Your administrator can configure which form to display. For example, your administrator selected the quick create form to display. When you select the tile, the quick create form opens in the right pane. |
| Inline record edits | Edit the record directly from the form displayed in the right pane without leaving the hierarchy. |
| Layout switch | To visualize the hierarchy that suits your convenience, you can switch between the vertical and horizontal layouts (rows or columns). In the left pane, at the bottom left, select the option depending on your preference. |
| Zoom and center view | Zoom in and out of the hierarchy to get a better view of the relationships between records. Also, center the view on a specific record to focus on its details and relationships. Select the required icon at the bottom right corner of the hierarchy pane. |
| Create new records | Create new records directly in the hierarchy. On the tile, select the More options icon and then select the option accordingly. The record is added under the selected parent record (tile). For example, a tile in the Account table hierarchy displays two options—Add new and Add existing. Select an option to create a new record or associate an existing record with the tile. |