Note
Access to this page requires authorization. You can try signing in or changing directories.
Access to this page requires authorization. You can try changing directories.
Watchlists in Microsoft Sentinel help you correlate data from a data source you provide with the events in your Microsoft Sentinel environment. For example, you might create a watchlist with a list of high value assets, terminated employees, or service accounts in your environment.
You can create a watchlist by using any of the following methods:
- Upload a watchlist file from a local folder
- Upload a watchlist file from your Azure Storage account
- Create a watchlist manually
You can currently upload local files up to 3.8 MB in size. A file that's over 3.8 MB and up to 500 MB is considered a large watchlist. To upload a large watchlist, upload the file to an Azure Storage account. Before you create a watchlist, review the limitations of watchlists.
Data in the Log Analytics Watchlist table is retained for 28 days.
Important
The features for watchlist templates, the ability to create a watchlist from a file in Azure Storage, and the ability to create a watchlist manually are currently in PREVIEW. The Azure Preview Supplemental Terms include additional legal terms that apply to Azure features that are in beta, preview, or otherwise not yet released into general availability.
Starting in July 2026, all customers using Microsoft Sentinel in the Azure portal will be redirected to the Defender portal and will use Microsoft Sentinel in the Defender portal only. Starting in July 2025, many new users are also automatically onboarded and redirected from the Azure portal to the Defender portal. If you're still using Microsoft Sentinel in the Azure portal, we recommend that you start planning your transition to the Defender portal to ensure a smooth transition and take full advantage of the unified security operations experience offered by Microsoft Defender. For more information, see It’s Time to Move: Retiring Microsoft Sentinel’s Azure portal for greater security.
Upload a watchlist from a local folder
You have two ways to upload a CSV file from your local machine to create a watchlist.
- For a watchlist file you created without a watchlist template: Select Add new and enter the required information.
- For a watchlist file created from a template downloaded from Microsoft Sentinel: Go to the watchlist Templates (Preview) tab. Select the option Create from template. Azure pre-populates the name, description, and watchlist alias for you.
Upload a watchlist from a file you created
If you didn't use a watchlist template to create your file:
In the Defender portal, go to Microsoft Sentinel > Configuration > Watchlist.
Select + New to open the Watchlist wizard.

On the General page, enter the name, description, and alias for the watchlist, and then select Next: Source.

On the Source page, use the information in the following table to upload your watchlist data, and then select Next: Review + create.
Field Description Source type Local file File type CSV file with a header (.csv) Number of lines before row with headings Enter the number of lines before the header row that's in your data file. Upload file Either drag and drop your data file, or select Browse for files and select the file to upload. SearchKey Enter the name of a column in your watchlist that you expect to use as a join with other data or a frequent object of searches. For example, if your server watchlist contains country/region names and their respective two-letter country codes, and you expect to use the country codes often for search or joins, use the Code column as the SearchKey. Note
If your CSV file is larger than 3.8 MB, you need to use the instructions for Create a large watchlist from file in Azure Storage.

Review the information, verify that it's correct, and then select Create.

A notification appears once the watchlist is created.


It might take several minutes for the watchlist to be created and the new data to be available in queries.
Upload a watchlist created from a template (preview)
To create a watchlist from a template you populated:
In the Defender portal, go to Microsoft Sentinel > Configuration > Watchlist.
Select the tab Templates (Preview).
Select the appropriate template from the list to view details of the template in the right pane.
Select Create from template to open the Watchlist wizard.
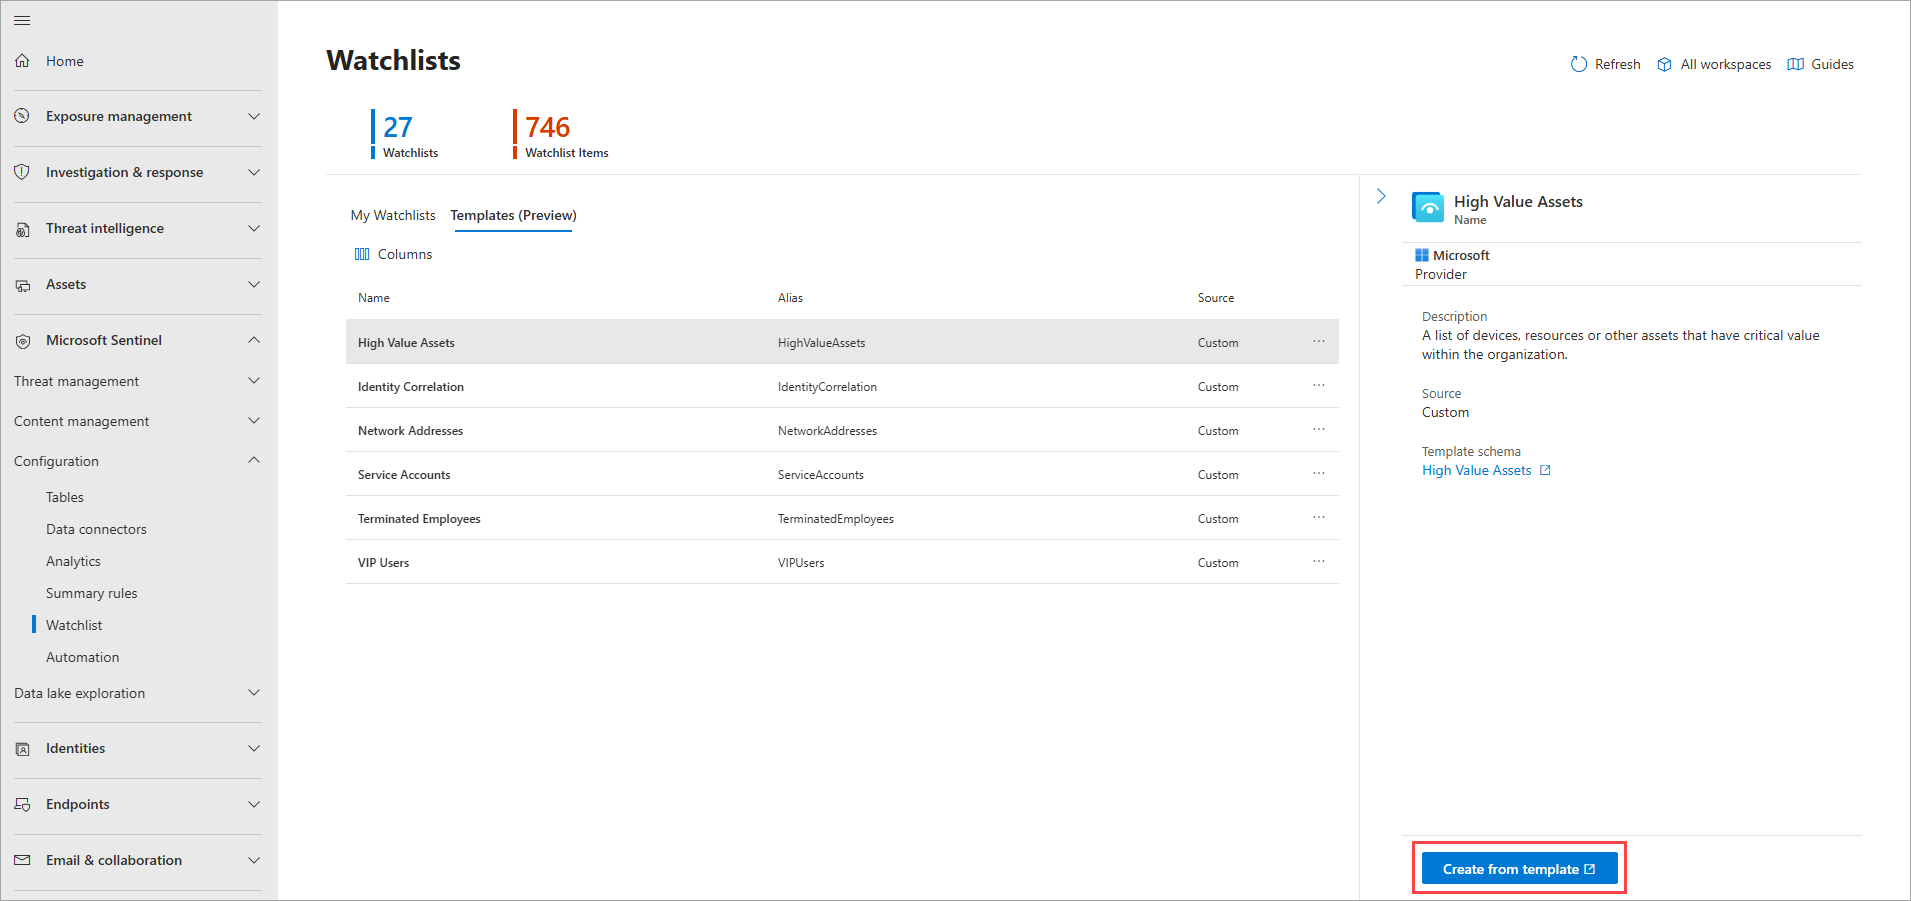
On the General page, notice that the Name, Description, and Alias fields are all read-only. Select Next: Source.
On the Source page, select Browse for files, and then select the file you created from the template.
Select Next: Review + create, and then select Create. A notification appears once the watchlist is created.

It might take several minutes for the watchlist to be created and the new data to be available in queries.
Create a large watchlist from file in Azure Storage (preview)
If you have a large watchlist up to 500 MB in size, upload your watchlist file to your Azure Storage account. Then create a shared access signature URL for Microsoft Sentinel to retrieve the watchlist data. A shared access signature URL is an URI that contains both the resource URI and shared access signature token of a resource like a CSV file in your storage account. Finally, add the watchlist to your workspace in Microsoft Sentinel.
For more information about shared access signatures, see Azure Storage shared access signature token.
Step 1: Upload a watchlist file to Azure Storage
To upload a large watchlist file to your Azure Storage account, use AzCopy or the Azure portal.
- If you don't already have an Azure Storage account, create a storage account. The storage account can be in a different resource group or region from your workspace in Microsoft Sentinel.
- Use either AzCopy or the Azure portal to upload your CSV file with your watchlist data into the storage account.
Upload your file with AzCopy
Upload files and directories to Blob storage by using the AzCopy v10 command-line utility. To learn more, see Upload files to Azure Blob storage by using AzCopy.
If you don't already have a storage container, create one by running the following command.
azcopy make
https://<storage-account-name>.<blob or dfs>.core.windows.net/<container-name>
Next, run the following command to upload the file.
azcopy copy '<local-file-path>' 'https://<storage-account-name>.<blob or dfs>.core.windows.net/<container-name>/<blob-name>'
Upload your file in Azure portal
If you don't use AzCopy, upload your file by using the Azure portal. Go to your storage account in Azure portal to upload the CSV file with your watchlist data.
- If you don't already have an existing storage container, create a container. For the level of public access to the container, use the default which is set to Private (no anonymous access).
- Upload a block blob to upload your CSV file to the storage account.
Step 2: Create shared access signature URL
Create a shared access signature URL for Microsoft Sentinel to retrieve the watchlist data.
- Follow the steps in Create SAS tokens for blobs in the Azure portal.
- Set the shared access signature token expiry time to at least six hours.
- Keep the default value for Allowed IP addresses as blank.
- Copy the value for Blob SAS URL.
Step 3: Add Azure to the CORS tab
Before using a SAS URI, add the Azure portal to the Cross Origin Resource Sharing (CORS).
- Go to the storage account settings, Resource sharing page.
- Select the Blob service tab.
- Add
https://*.portal.azure.netto the allowed origins table. - Select the appropriate Allowed methods of
GETandOPTIONS. - Save the configuration.
For more information, see CORS support for Azure Storage.
Step 4: Add the watchlist to a workspace
In the Defender portal, go to Microsoft Sentinel > Configuration > Watchlist.
Select + New to open the Watchlist wizard.
On the General page, enter the name, description, and alias for the watchlist, and then select Next: Source.
On the Source page, use the information in the following table to upload your watchlist data, and then select Next: Review + create.
Field Description Source type Azure Storage (Preview) Select a type for the dataset CSV file with a header (.csv) Number of lines before row with headings Enter the number of lines before the header row that's in your data file. Blob SAS URL (Preview) Paste the shared access URL you created. SearchKey Enter the name of a column in your watchlist that you expect to use as a join with other data or a frequent object of searches. For example, if your server watchlist contains country/region names and their respective two-letter country codes, and you expect to use the country codes often for search or joins, use the Code column as the SearchKey. Review the information, verify that it's correct, and then select Create. A notification appears once the watchlist is created.
It might take a while for a large watchlist to be created and for the new data to be available in queries.
Create a watchlist manually (preview)
To create a watchlist from scratch:
In the Defender portal, go to Microsoft Sentinel > Configuration > Watchlist.
Select + New to open the Watchlist wizard.
On the General page, enter the name, description, and alias for the watchlist, and then select Next: Source.
On the Source page, choose Manual (Preview) as the Source type.
Add and define the column names for your watchlist. Choose the column that serves as your Search Key. This key is the column in your watchlist that you expect to use as a join with other data or a frequent object of searches.

Select Next: Review + create.
Review the information, verify that it's correct, and then select Create. A notification appears once the watchlist is created.

It might take several minutes for the watchlist to be created and the new data to be available in queries.
Note
Watchlists you create manually automatically contain a single entry that uses default values. You can update this entry as needed. For more information, see Manage watchlists.
View watchlist status
To view the status of a watchlist in your workspace:
In the Defender portal, go to Microsoft Sentinel > Configuration > Watchlist.
On the My Watchlists tab, select the watchlist.
On the details page, review the Status (Preview).

When the status is Succeeded, select View in logs to use the watchlist in a query. It might take several minutes for the watchlist to show in Log Analytics.


Download watchlist template (preview)
Download one of the watchlist templates from Microsoft Sentinel to populate with your data. Then upload that file when you create the watchlist in Microsoft Sentinel.
Each built-in watchlist template has its own set of data listed in the CSV file attached to the template. For more information, see Built-in watchlist schemas.
To download one of the watchlist templates:
In the Defender portal, go to Microsoft Sentinel > Configuration > Watchlist.
Select the tab Templates (Preview).
Select a template from the list to view details of the template in the right pane.
Select the ellipses ... at the end of the row.
Select Download Schema.
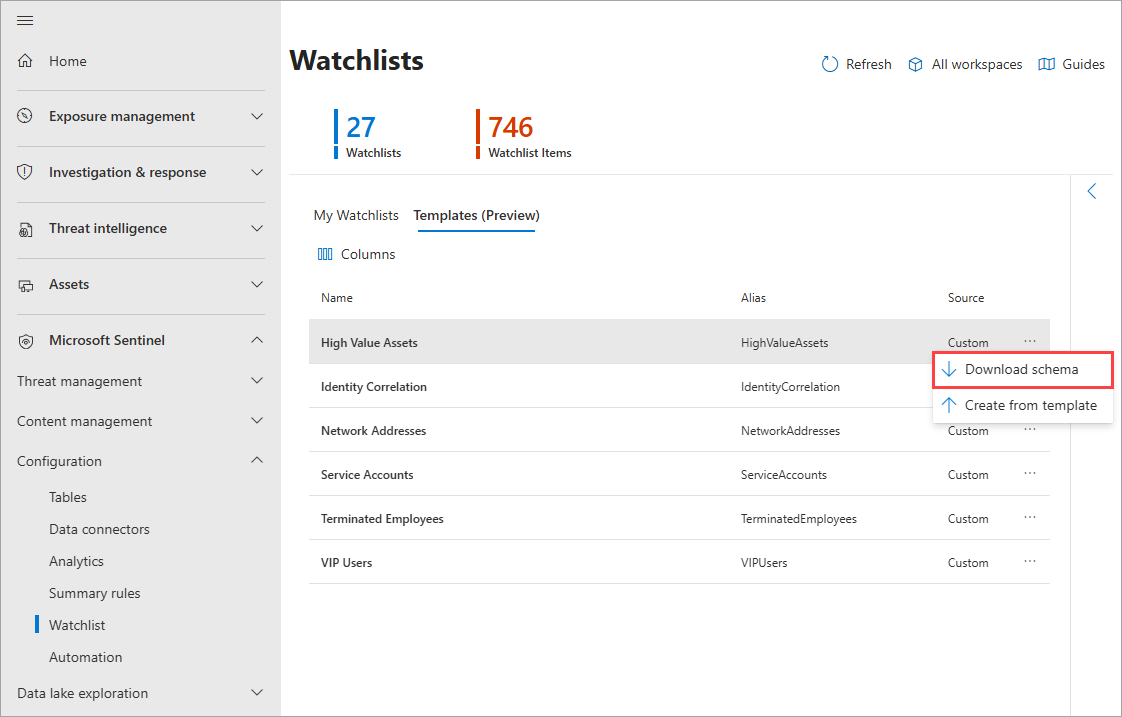
Populate your local version of the file and save it locally as a CSV file.
Follow the steps to upload watchlist created from a template (Preview).
Deleted and recreated watchlists in Log Analytics view
If you delete and recreate a watchlist, you might see both the deleted and recreated entries in Log Analytics within the five-minute SLA for data ingestion. If you see these entries together in Log Analytics for a longer period of time, submit a support ticket.
Related content
To learn more about Microsoft Sentinel, see the following articles:
- Learn how to get visibility into your data and potential threats
- Get started detecting threats with Microsoft Sentinel
- Use workbooks to monitor your data.
- Manage watchlists
- Build queries and detection rules with watchlists