Important
For new virtual networks created after March 31, 2026, Azure defaults subnets to private, which disables default outbound access. Any VM that must reach public internet or public Microsoft endpoints now needs an explicit outbound method. Existing virtual networks aren't changed automatically. For more information, see the official announcement.
This document outlines different options to configure explicit outbound internet connectivity to reach internet or public endpoint for Azure Virtual Machines (VMs) running SAP workloads. It covers both standalone VMs and VMs placed behind an internal Azure Standard Load Balancer.
Overview
When VMs without public IP addresses are placed in the backend pool of an internal Standard Azure Load Balancer, they have no outbound internet connectivity by default. Now the behavior applies to all VMs in new virtual networks, including standalone VMs not associated with any load balancer.
A VM can reach public endpoints if it has a directly assigned public IP address. The same applies when the VM is part of a load balancer backend pool that has a public IP address.
SAP systems typically handle sensitive business data, making it rarely acceptable for SAP VMs to be directly accessible via public IP addresses. However, certain scenarios require outbound connectivity from VMs to public endpoints. Common examples include:
- Azure fence agent requires access to
management.azure.com and login.microsoftonline.com for fencing a failed node operation in pacemaker clusters.
- Azure Backup
- Azure Site Recovery
- Using package repositories for patching the operating system.
- SAP application data flow requires outbound connectivity to external APIs or partner systems.
Some SAP deployments don't require outbound connectivity. In these cases, an internal Azure Standard Load Balancer for high availability, or a standalone VM without a public IP is sufficient. No extra networking setup is required.
Note
When VMs without public IP addresses are added to the back-end pool of an internal Standard Azure Load Balancer, they lack outbound internet connectivity. Further configuration is needed to enable routing to public endpoints.
VMs that have public IP addresses, or that are included in an Azure Load Balancer backend pool with a public IP, already have outbound access to public endpoints.
Outbound connectivity options
There are different ways to configure explicit outbound connectivity for VMs, as illustrated in the flowchart at How and when default outbound access is provided. Before selecting an approach, review the capabilities, constraints, and supporting documentation for each option to determine the best fit for your SAP environment, security requirements, and operational model.
- There are many different proxy options available in the industry. Understand how the proxy is configured in your environment.
Achieve outbound connectivity to public end points
Azure NAT Gateway is a fully managed, highly resilient Network Address Translation (NAT) service that provides outbound connectivity for VMs in a subnet. NAT Gateway is configured at the subnet level. Once associated with a subnet, it becomes the preferred outbound connectivity method for all resources in that subnet. It takes precedence over other outbound configurations, including load balancer outbound rules and instance-level public IP addresses.
To achieve outbound connectivity to public end points, without allowing inbound connectivity to the VM from a public end point, associate an Azure NAT Gateway with the subnet where the SAP VMs and Standard Load Balancer are deployed. Use Network Security Groups to control the public end points that are accessible for outbound calls from the VMs.
Important considerations
- Azure NAT Gateway is a fully managed service with built-in high availability and supports zonal and zone-redundant deployments. No additional infrastructure or routing configuration is required. Review the key limitation of Standard v2 Azure NAT Gateway (zone-redundant) to ensure that it supports your configuration.
- NAT Gateway is configured at the subnet level. All VMs in the associated subnet automatically use the NAT Gateway for outbound connectivity. No per-VM configuration is needed.
- When a NAT Gateway is associated with a subnet, it takes precedence over other explicit outbound methods, including load balancer outbound rules and instance-level public IP addresses for new connections.
Deployment steps
For step-by-step instructions on creating and configuring an Azure NAT Gateway, see:
Create external Azure Standard Load Balancer for outbound connections to internet.
To achieve outbound connectivity to public end points, without allowing inbound connectivity to the VM from a public end point, create a load balancer with a public IP address. Then you add the VMs to the backend pool of the load balancer where only outbound rules are defined. Use Network Security Groups to control the public end points that are accessible for outbound calls from the VM. For more information, see Scenario 2 in Outbound connections.
The configuration would look like:

Important considerations
- You can use one extra Public Load Balancer for multiple VMs in the same subnet to achieve outbound connectivity to public end point and optimize cost.
- Use Network Security Groups to control which public end points are accessible from the VMs. You can assign the Network Security Group either to the subnet, or to each VM. Where possible, use Service tags to reduce the complexity of the security rules.
- Azure standard Load balancer with public IP address and outbound rules allows direct access to public end point. If you have corporate security requirements to have all outbound traffic pass via centralized corporate solution for auditing and logging, you might not be able to fulfill the requirement with this scenario.
Tip
Where possible, use Service tags to reduce the complexity of NSG.
Deployment steps
Create the Load Balancer.
In the Azure portal, select All resources, Add, then search for Load Balancer.
Select Create.
Load Balancer Name: MyPublicILB.
Select Public as a type, Standard as SKU.
Select Create Public IP address and specify as a name MyPublicILBFrondEndIP.
Select Zone Redundant as Availability zone.
Select Review and Create, then select Create.
Create the Backend pool MyBackendPoolOfPublicILB and add the VMs.
- Select the Virtual network.
- Select the VMs and their IP addresses and add them to the backend pool.
Create outbound rules.
az network lb outbound-rule create --address-pool MyBackendPoolOfPublicILB --frontend-ip-configs MyPublicILBFrondEndIP --idle-timeout 30 --lb-name MyPublicILB --name MyOutBoundRules --outbound-ports 10000 --enable-tcp-reset true --protocol All --resource-group MyResourceGroup
Create Network Security group rules to restrict access to specific Public End Points. If there's existing Network Security Group, you can adjust it. The following steps show how to enable access to the Azure management API:
- Navigate to the NSG.
- Select Outbound Security Rules.
- Add a rule to Deny all outbound Access to Internet.
- Add a rule to Allow access to AzureCloud, with priority lower than the priority of the rule to deny all internet access.
The outbound security rules would look like:
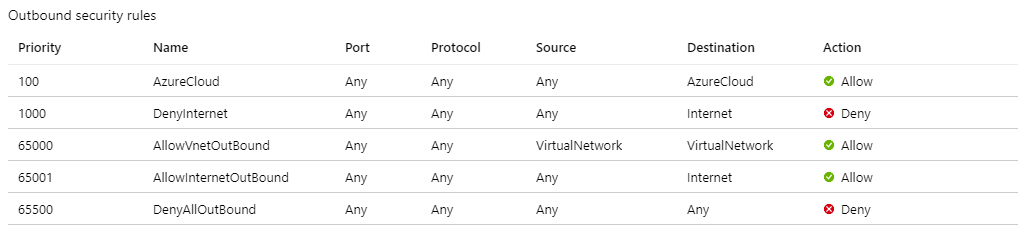
For more information on Azure NSG, see Security Groups.
Another option to achieve outbound connectivity to public end points, without allowing inbound connectivity to the VM from public end points, is with Azure Firewall. Azure Firewall is a managed service, with built-in High Availability and it can span multiple Availability Zones.
You also need to deploy a User Defined Route associated with subnet where VMs and the Azure load balancer are deployed, pointing to the Azure firewall to route traffic through the Azure Firewall. For details on how to deploy Azure Firewall, see Deploy And Configure Azure Firewall.
The architecture would look like:
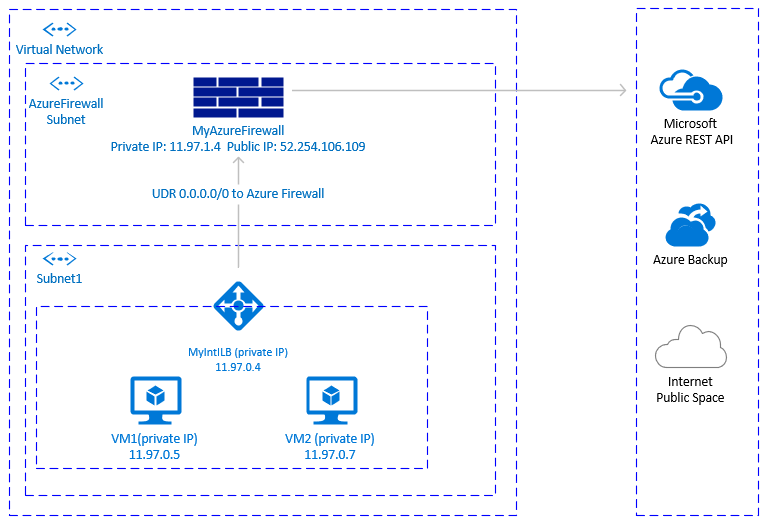
Important considerations
- Azure firewall is cloud native service, with built-in High Availability and it supports zonal deployment.
- Requires an extra subnet that must be named AzureFirewallSubnet.
- Outbound transfer of large data sets from the virtual network hosting SAP VMs to another virtual network or public endpoint can result in higher costs. One such example is copying large backups across virtual networks. For details, see Azure Firewall pricing.
- When the corporate firewall isn't an Azure Firewall and outbound traffic is required to pass through a centralized corporate security solution, this option might not be practical.
Tip
Where possible, use Service tags to reduce the complexity of the Azure Firewall rules.
Deployment steps
The deployment steps assume that you already have your virtual network and subnet defined for your VMs.
- Create the subnet AzureFirewallSubnet in the same virtual network, where the VMs and the Standard Load Balancer are deployed.
- In Azure portal, navigate or search for Virtual Network, then select All Resources.
- Search for the virtual network, select Virtual Network, then select Subnets.
- Select Add Subnet. Enter AzureFirewallSubnet for the name. Enter an appropriate IP address range.
- Save your information.
Create an Azure Firewall.
- In Azure portal, select All resources. Then select Add, Firewall, Create. Select Resource group (select the same resource group where the Virtual Network is).
- Enter name for the Azure Firewall resource. For instance, MyAzureFirewall.
- Select Region, select at least two Availability zones aligned with the Availability zones where your VMs are deployed.
- Select your virtual network, where the SAP VMs and Azure Standard Load balancer are deployed.
- Public IP Address: Select Create and enter a name. For instance, MyFirewallPublicIP.
Create Azure Firewall Rule to allow outbound connectivity to specified public end points. The example shows how to allow access to the Azure Management API public endpoint.
- Select Rules, Network Rule Collection, then select Add network rule collection.
- Name: MyOutboundRule, enter Priority, then select action: Allow.
- Service Name: ToAzureAPI.
- Protocol: Select Any.
- Source Address: Enter the range for your subnet where the VMs and Standard Load Balancer are deployed. For instance, 11.97.0.0/24.
- Destination ports: Enter *.
- Save your information.
- As you're still positioned on the Azure Firewall, select Overview. Write down the Private IP Address of the Azure Firewall.
Create an Azure Firewall route.
- In Azure portal, select All resources, select Add, Route Table, Create.
- For *Name, enter MyRouteTable, select Subscription, Resource group, and Location (matching the location of your virtual network and Firewall).
- Save your information.
The firewall rule would look like:

Create User Defined Route from the subnet of your VMs to the private IP of MyAzureFirewall.
- As you're positioned on the Route Table, select Routes, then select Add.
- Route name: ToMyAzureFirewall
- Address prefix: 0.0.0.0/0.
- Next hop type: Select Virtual Appliance.
- Next hop address: Enter the private IP address of the firewall you configured: 11.97.1.4.
- Save your information.
You could use proxy to allow Pacemaker calls to the Azure management API public end point.
Important considerations
- If there's already corporate proxy in place, you could route outbound calls to public end points through it. Outbound calls to public end points go through the corporate control point.
- Make sure the proxy configuration allows outbound connectivity to Azure management API:
https://management.azure.com and https://login.microsoftonline.com.
- Make sure there's a route from the VMs to the Proxy.
- Proxy handles only HTTP/HTTPS calls. If there's a need to make outbound calls to public end point over different protocols (like RFC), an alternative solution is needed.
- The Proxy solution must be highly available, to avoid instability in the Pacemaker cluster.
- Depending on the location of the proxy, it could introduce extra latency in the calls from the Azure Fence Agent to the Azure Management API. If your corporate proxy is still on the premises, while your Pacemaker cluster is in Azure, measure latency and consider, if this solution is suitable for you.
- If there isn’t already highly available corporate proxy in place, we don't recommend this option as the customer would be incurring extra cost and complexity. If you decide to deploy extra proxy solution, to allow outbound connectivity from Pacemaker to Azure Management public API, you need to make sure the proxy is highly available. The latency from the VMs to the proxy is low.
Pacemaker configuration with Proxy
There are many different Proxy options available in the industry. Step-by-step instructions for the proxy deployment are outside of the scope of this document. In the following example, we assume that your proxy is responding to MyProxyService and listening to port MyProxyPort.
To allow pacemaker to communicate with the Azure management API, perform the following steps on all cluster nodes:
Edit the pacemaker configuration file /etc/sysconfig/pacemaker and add the following lines (all cluster nodes):
sudo vi /etc/sysconfig/pacemaker
# Add the following lines
http_proxy=http://MyProxyService:MyProxyPort
https_proxy=http://MyProxyService:MyProxyPort
Restart the pacemaker service on all cluster nodes.
SUSE:
# Place the cluster in maintenance mode
sudo crm configure property maintenance-mode=true

#Restart on all nodes
sudo systemctl restart pacemaker

# Take the cluster out of maintenance mode
sudo crm configure property maintenance-mode=false
Red Hat:
# Place the cluster in maintenance mode
sudo pcs property set maintenance-mode=true

#Restart on all nodes
sudo systemctl restart pacemaker

# Take the cluster out of maintenance mode
sudo pcs property set maintenance-mode=false
Other options
If outbound traffic is routed via third party, URL-based firewall proxy:
If using Azure fence agent, make sure the firewall configuration allows outbound connectivity to the Azure management API https://management.azure.com and https://login.microsoftonline.com.
If using SUSE's Azure public cloud update infrastructure for applying updates and patches, see Azure Public Cloud Update Infrastructure 101.
Next steps