Note
Access to this page requires authorization. You can try signing in or changing directories.
Access to this page requires authorization. You can try changing directories.
Azure Communication Services Advanced Messaging SDK enables AI agents in Microsoft Copilot Studio to send and receive WhatsApp messages to users. Each AI agents are linked to a unique WhatsApp Business phone number.
Overview
This article covers the prerequisites to configuring WhatsApp as a Channel in Microsoft Copilot Studio.
- Create an Azure Communication Services resource in Azure portal.
- Get a phone number that can receive SMS.
- Setup and Deploy Event Grid Viewer
- Setup Event subscription for SMS received.
- Connect WhatsApp business account as a channel in Azure Communication Services Resource
The following video demonstrates this process.
Prerequisites
- Facebook account
- Active Meta Business account
- An Azure account with an active subscription where you have the role of an owner. Create an account for free.
Create an Azure Communication Services resource in Azure portal
Follow the instructions in Create an Azure Communication Services resource using Azure portal section.
When following those instructions, here are helpful tips:
Use the following image as an example of how you can fill in your project details and instance details to create your resource.

Assigning tags to your resource is optional.
Once your resource is deployed, continue with the below instructions.

Get a phone number
You can provision a SMS enabled phone number from Azure Communication Services or bring your own phone number.
Make sure the phone number has the following capabilities:
- Able to receive SMS so your phone number can be verified by Meta
- Phone number isn't already associated with a WhatsApp Business Account
If you're using an Azure Communication Services phone number, continue to follow the subsequential steps.
If you're bringing your own phone number, jump to next section.
Setup and Deploy Event Grid Viewer
The following steps are only needed if you chose to use an Azure Communication Services phone number with SMS enabled. The Event Grid Viewer displays notification information for events it's subscribed to.
Click on the following button to launch a custom template for the Azure portal instance that you're logged into to set up the Event Grid Viewer.

Fill in the required fields. Because the site name creates a DNS entry, it needs to be globally unique. We recommend that you include your alias in the name for this step. Here are suggestions for filling out the deployment details:
Subscription- Select the subscription that contains your Azure Communication Services resource.Resource Group- Select the resource group that contains your Azure Communication Services resource.Region- Select the resource group that contains your Azure Communication Services resource.Site Name- Create a name that is globally unique. This site name is used to create a domain to connect to your Event Grid Viewer.Hosting Plan Name- Create any name to identify your hosting plan.Sku- Use the SKU F1 for development and testing purposes. If you encounter validation errors creating your Event Grid Viewer that say there's no more capacity for the F1 plan, try selecting a different region. For more information about SKUs, see App Service pricing.
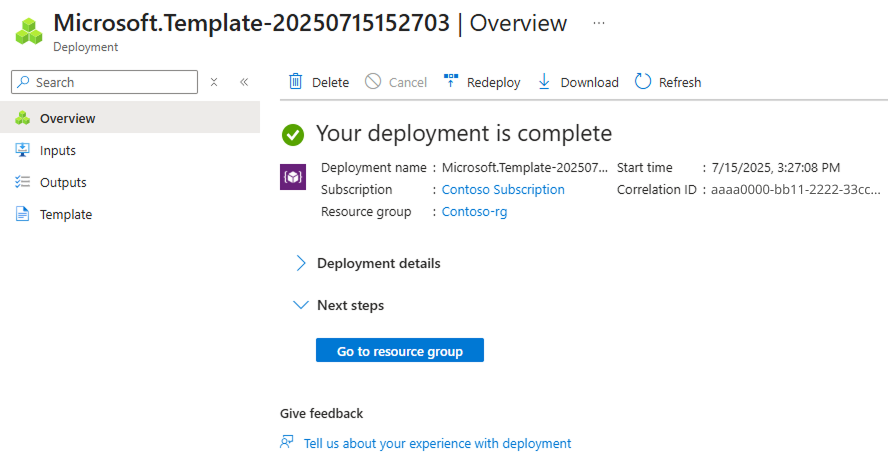
Then select Review + Create.
After the deployment completes, select Go to resource group.
Select on your Event Grid Viewer.

On the resource overview page, select on the copy button next to the Default Domain property.

Launch that site in your browser and keep it running so you can receive the verification code when you're connecting your WhatsApp business account to Azure Communication Services resource. The Event Grid Viewer should look like this.


Subscribe to SMS received event
Getting the verification code is required to link your WhatsApp business account to Azure Communication Services resource. Follow these instructions to have the Azure Event Grid subscribe to the SMS Received event.
When following those instructions, here are helpful tips:
When filling in the details for the new event subscription.
Name: Enter a descriptive name for the event subscription.System Topic Name: Enter a unique name, unless this name is already prefilled with a topic from your subscription.Filter to Event Types: Select SMS Received. No need to select SMS Delivery Report ReceivedEndpoint Type: Select Web HookEndpoint: Append/api/updatesto the URL of the Event Grid Viewer (step 6 of Set up and Deploy Event Grid Viewer). It should be something likehttps://{{site-name}}.azurewebsites.net/api/updates


Connect WhatsApp business account as a channel in Azure Communication Services Resource
With your newly created Azure Communication Services resource, on the left navigation bar, select on the Advance Messaging and then select Channels. To add a new WhatsApp Business Account, select on the Connect button.

Select WhatsApp as the channel and select the Connect button.

Acknowledge the Data Transfer and Independent Terms of Service.

Select the Next button to continue
Select the SMS enabled phone number you wish to use to connect to your WhatsApp Business Account. This can be either the Azure Communication Services phone number you previously provisioned or bring your own phone number.

Select the Next button.
Select the Login with Facebook button to link your WhatsApp business account.

A new Facebook Login page pops up as a new window. Provide your login.

The next screen notifies you that the Azure Communication Services app will receive your name and profile picture. It gives permission to Azure Communication Services APIs to manage your WhatsApp Business Account. Select Continue.
Note that from here on out, the experience is managed by Facebook and not Azure so the screens are subject to change.

After signing in, the next screen summarizes the permissions, you'll be granting Azure Communication Services to manage your WhatsApp Business Account. Select the Get Started button.

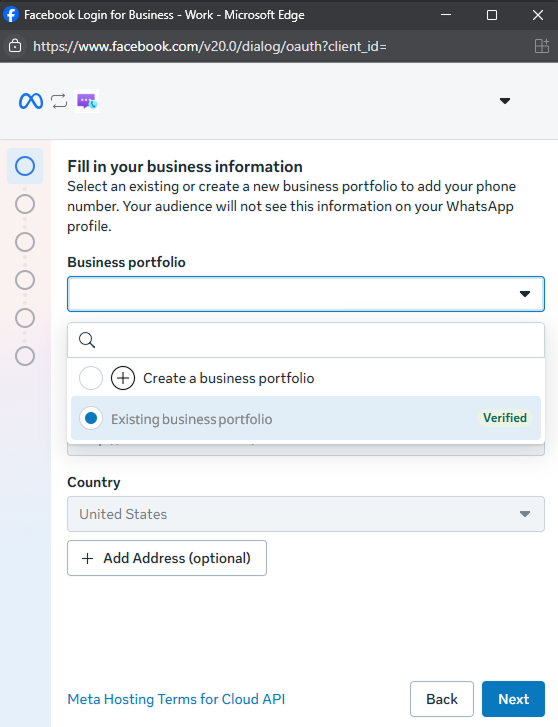
Now that the WhatsApp Business Account is signed into, select or create the existing Business portfolio. Then select the Next button.
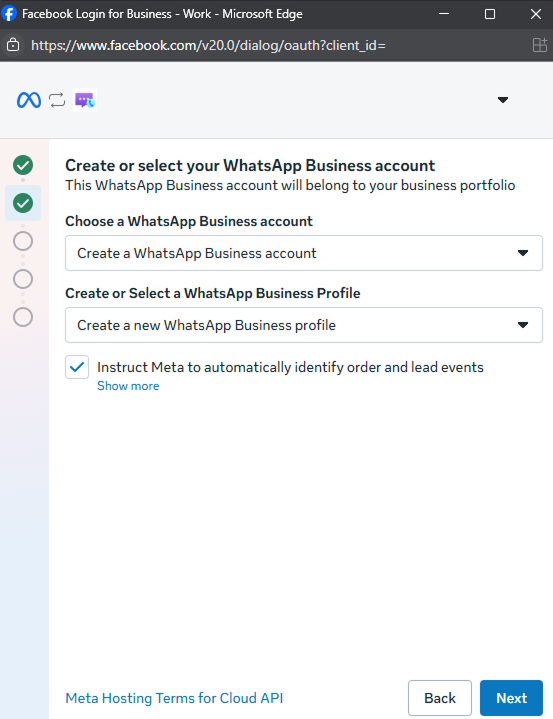
Select or create a WhatsApp Business Account.

Select or create a WhatsApp Business Profile. Fill out the required information.

The phone number you provide will be linked to your WhatsApp Business Account and can't be used by another WhatsApp Business account.
Use the Azure Communication Services phone number you provisioned previously or bring your own phone number.
If the phone number you're bringing is:
- Under a solution provider other than Azure Communication Services, follow these instructions to migrate your phone number to Azure Communication Services. Create a support ticket if help is needed.
- An existing WhatsApp number and want to migrate it to a WhatsApp business account, follow these instructions. Create a support ticket if help is needed.
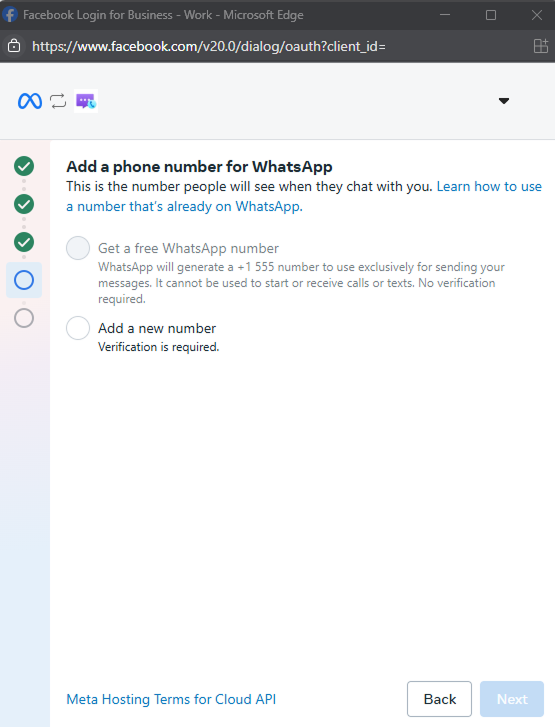
Select Add a new number. Choose to either verify your phone number through a text message or phone call.

The Event Grid view you deployed will receive the text message of the verification code.

Enter the verification code and select Next.

Review the access request and select Continue.
Select Finish.
Now in your Azure Communication Services resource, under Channels, you'll see a new channel connected with a status of Display name review pending.
The status of your WhatsApp Business account is displayed in the Azure portal. Once approved, you will see an Active status.

Only when you see that status can you use the WhatsApp Business account to send and receive messages without limitations of number of messages and recipients per day. It also unlocks the ability to link WhatsApp Business account as a channel in Microsoft Copilot Studio.
Meta reviews your business's display name. You can learn more about this review process and how to update your business account's display name in the article About WhatsApp Business display name.
When you no longer want to use the WhatsApp Business account with Azure Communication Services, you can select the account and select the Disconnect button. This option disconnects the account from Azure Communication Services but doesn't delete the account and the account can be reconnected later.


WhatsApp account status
You can see the status of your WhatsApp Business account in the Azure portal. Accounts with different statuses have different restrictions on messaging features. An account can have following types of status.
| Status | Meaning | Suggested Action |
|---|---|---|
| Active | A WhatsApp account is ready to use. | |
| Revoked | A WhatsApp account is unshared or deleted from the WhatsApp side. | If you no longer want to use the WhatsApp Business account, you can disconnect the account. If you still want the WhatsApp Business account connected, you need to redo the registration process by disconnecting then reconnecting the account. |
| Disconnected | A WhatsApp account is disconnected from the Azure portal side. | If you no longer want to use the WhatsApp Business account, you need to go to WhatsApp manager portal to unshare the WhatsApp Business Account or delete the phone number or delete the WhatsApp Business Account for a complete disconnection. If you still want the WhatsApp Business account connected, you need to redo the registration process by disconnecting then reconnecting the account. |
| Phone number deleted | A WhatsApp Business phone number is deleted from the WhatsApp side. | If you no longer want to use the WhatsApp Business account, you can disconnect the account. If you still want the WhatsApp Business account connected, you need to redo the registration process by disconnecting then reconnecting the account with adding the same phone number. |
| Business account review rejected | WhatsApp disabled the business account because it doesn't comply with WhatsApp Business's Commerce Policy. | Check details on WhatsApp manager portal and request a review if you believe that this rejection is incorrect. |
| Display name review not started | WhatsApp didn't start a WhatsApp Business display name review for your business phone number. Typically, the review didn't start because your Meta business account has not yet finish Meta Business Verification. See this link for details about Meta Business Verification. | WhatsApp Business display name review isn't required to get started. You can immediately start sending messages to customers. You have limited number of messages and recipients per day until WhatsApp Business display name review is approved. |
| Display name review pending | The WhatsApp business phone number display name is under review by WhatsApp. | WhatsApp Business display name review isn't required to get started. You can immediately start sending messages to customers. You have limited number of messages and recipients per day until WhatsApp Business display name review is approved. |
| Display name review rejected | WhatsApp rejects the WhatsApp business phone number display name. | Check details and submit a new phone number display name on WhatsApp manager portal. WhatsApp Business display name review isn't required to get started. You can immediately start sending messages to customers. You have limited number of messages and recipients per day until WhatsApp Business display name review is approved. |
Next steps
This article covered the prerequisites for configuring WhatsApp as a channel in Microsoft Copilot Studio. You're now ready to deploy your AI agent to your WhatsApp Business phone number.